
This post is part of a series on Playspace Design. Other posts in the series include:
Our Playroom
Our Playroom
Natural Rock Play Space and Outdoor Kitchen
.jpg)
One of the things on my list of must-haves was an outdoor sound wall.

There's a beautiful hydrangea behind it and when it's in bloom with giant blue-purple blooms this view is rather breathtaking. (The two other tan beams you see in the background of the photo are the supports for our deck above.)

To make our sound wall, I first went shopping at our Seattle Goodwill. I searched for anything that I felt would make interesting sounds (for the wall itself) and for any interesting and unusual items we could use as "drum sticks". I ended up purchasing two types of colander, a cream (tea) dispenser, a fish and a clover gelatin mold, part of a broiler, a drying rack, a bell, and a pot lid. The awesome rusted crow was actually left behind by our home's previous owners and he is the perfect addition there in the upper right hand corner.

I also picked up a few strange shaped whisks, some interesting large spoons, and a potato masher for, well, banging. :) I keep those loose parts in a clear plastic shower caddy (the caddy keeps them organized, but the holes in the shower caddy don't allow for the collection of water).

Once I'd purchased all the items, I laid them out to determine the size of the wall I wanted to make. We decided on a 2 x 12 single piece of wood and had it cut at Home Depot to the length we wanted/our space was able to accomodate. We bolted that piece of wood to two 4 x 4 pillars that we also had cut to size on site. The pillars are buried 1/3 in the ground (you can just dig a big hole, and once you get the wall where you want using a level, and then add pea gravel to "set" the pillars before adding dirt) and we chose the height based on S's height at the time (we built this over a year ago, and chose a height that she could reach at the time, but that would also grow with her).
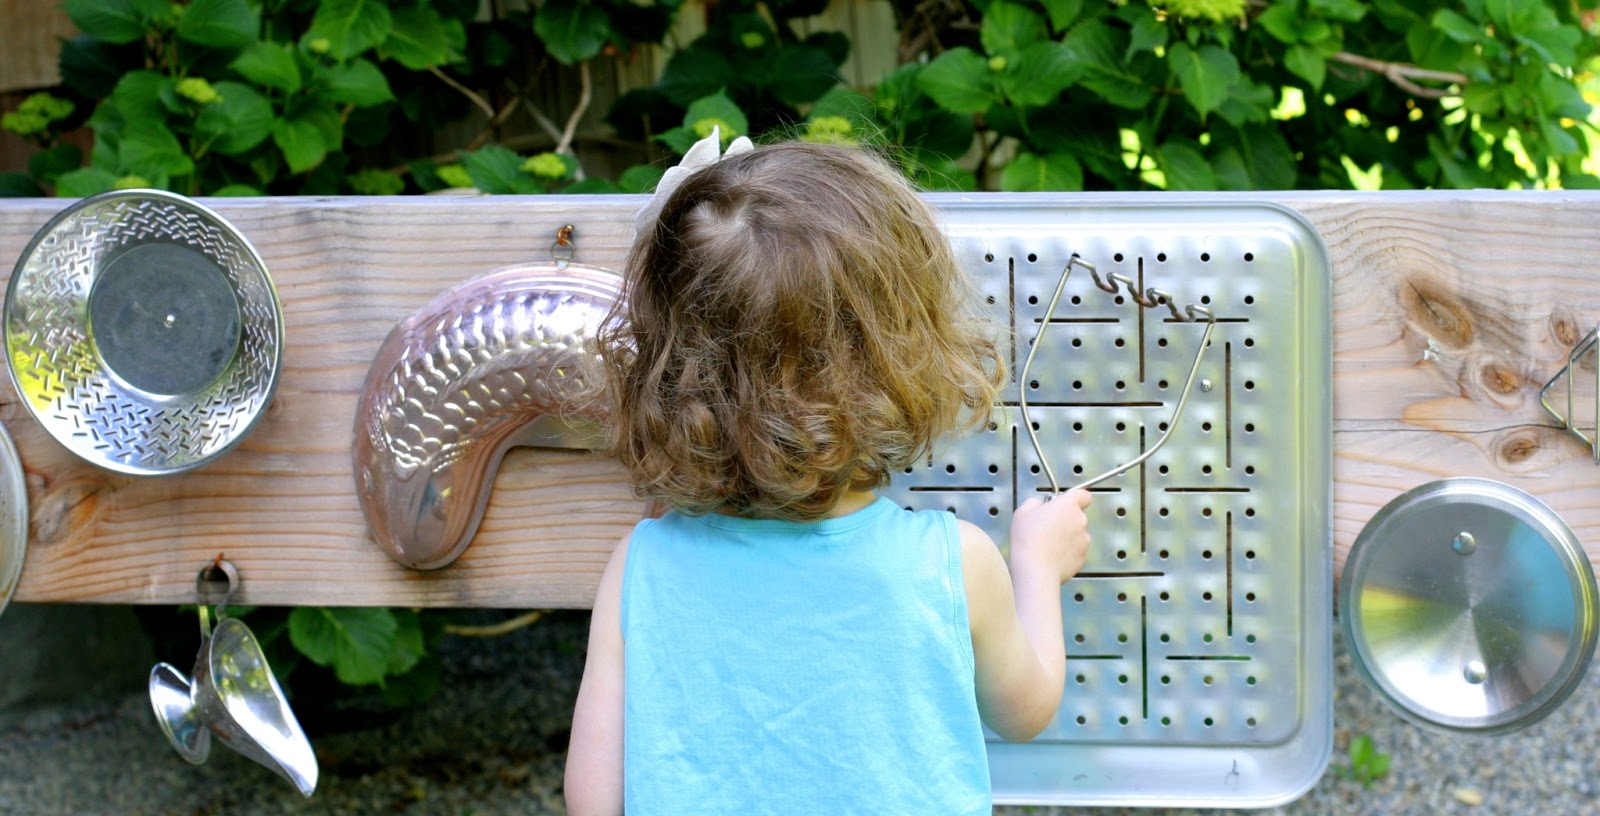
I mounted most of the items with the same hooks I used to mount X's texture circles for his Sensory Board, though a few items necessitated screws. I tried to hang them in ways that would create the widest variety of sounds - for instance, you can see that the broiler plate S is "playing" is partially on and partially off the board so she can investigate how that affects the sound it makes. I love that we were able to make a wall long enough that several children can make "music" at once (as they do when S has lots of friends over).

And if you're not yet standing on your own, you can always watch and make music with the spoons and whisks in the shower caddy. :)

Follow along with Fun at Home with Kids on Facebook, Google+, Pinterest or Subscribe by Email or Bloglovin'!
All activities here are activities I feel are safe for my own children. As your child's parents/guardians, you will need to decide what you feel is safe for your family. I always encourage contacting your child's pediatrician for guidance if you are not sure about the safety/age appropriateness of an activity. All activities on this blog are intended to be performed with adult supervision. Appropriate and reasonable caution should be used when activities call for the use of materials that could potentially be harmful, such as scissors, or items that could present a choking risk (small items), or a drowning risk (water activities), and with introducing a new food/ingredient to a child (allergies). Observe caution and safety at all times. The author and blog disclaim liability for any damage, mishap, or injury that may occur from engaging in any of these activities on this blog.


LOVE! I wish our winters weren't so brutal and so long. That and the amount of snow we get in our backyard would make it impossible to have a permanent music wall. I want one so bad!!
ReplyDeleteOh man, I know you would make a fabulous one, too, Dyan! Stinking winters!!!!!
DeleteIf you can stand the noise use an inside drying rack.
DeleteThis looks like so much fun...and easy to put together! Perfect for us!
ReplyDeleteThank you, Shaunna! Yes, especially if you get the wood cut to size at Home Depot, it's super easy to put together! :)
DeleteOOoo super easy and major fun..Looks like it is going to be fantastic series :)
ReplyDeleteThank you, Suja! And I hope so. :)
DeleteAwesome! I wish I could and come and play in your backyard too :) It is so cool and I love that the little kiddo has his own set-up too :)
ReplyDeleteThank you, Veena! :) It is a lot of fun back there... ;)
DeleteI absolutely love it! I really need to do up one of these for the hooligans!
ReplyDeleteThank you, Jackie! Yes, it would be a perfect addition to your amazing backyard play space!
DeleteI LOVE this idea... so simple yet so cool!!!
ReplyDeleteThank you, Kate! :)
DeleteLove this...am currently working on collecting items for ours and trying to work out a design...yours is just beautiful and looks like so much fun. Such a cutie sitting there making his own fun too!
ReplyDeleteHi Jodie! I've been following along with yours - it's coming along so well! We finished ours last year and it's so nice to just be able to enjoy it this year. :) I really love your rock quarry!
DeleteI attached mine to our chain link fence with zip ties.
ReplyDeleteOoh! That's a great idea Marlene!
DeleteThanks for the zip tie idea..... I'm going to try this. :)
DeleteThank you for this! I just saw this last week and went about building it. This is great for all ages- I have older kids (6 and 11) and they LOVE it! We had some old drumsticks that we attached to it, as well and it's been thrilling our neighbors, hee hee! :)
ReplyDeleteAwesome! And hahahahaa
Delete