
This is the third post in my designing playspaces series:
You can read about our Playroom design here.
You can read about our Reading Room design here.
You can read about our Backyard design sometime in June. :)
Before we even start, can I just say - this room is SO HARD TO PHOTOGRAPH! There is barely any natural light and there are track lights that kept throwing my cameras (I had to use a point and shoot to capture some of the angles) off and giving everything a weird color. If I were a more accomplished photographer and/or knew how to use Photoshop to correct, everything would have looked much nicer. So please forgive my floundering photos here!!!
Now that I have that off my chest - we can get back to the post. :)

Affiliate links to Amazon are included for your convenience.
S is a very accomplished artist. She was drawing faces and stick people by the time she was 2. She comes by it honestly - my mom is a professional artist. By the time she was about 14 months old, S would spend hours every day creating art - so an Art Room was another must! When we bought the house, the Art Room was a home gym. The paint was a beige-gray, and it felt very dark (the person who took this picture most assuredly brought professional lighting along!). Both because I thought I could do something fun with the cement wall that ran the length of the back of the room and because I hated the carpet (so we don't worry about paint spills, hahaha!) - I decided this was my future Art Room. Though we left the old carpet, we did repaint the walls a bright white to bring whatever light we could to the super dark room.

I know that we do basically all of our sensory play in a clear bin upstairs for the blog (because the lighting is really just SO BAD downstairs) and because X can't stand and play yet - but the ultimate location of most of our sensory play is in the Art Room. Here S is playing with her very favorite material - Moon Sand. You can start to get a sense for my storage scheme to the left there. The sensory materials are stored in plastic shoe storage containers (some from the Dollar Store and some from Target - the Target ones are much better) and the white shelving is also from Target (but it's terrible - buy the Ikea version if you can - we just didn't have the time/energy to make another Ikea trip once we realized we wanted an accesible storage system for our sensory materials).

Here's another view of the storage system. The way I have it set up is such that any of the "tools" on top of the shelving are fair game for any sensory material. If S wants to mix two materials from the bins below, she needs to check first. Some things mix easily (like the Moon Sand and glass gems she's playing with above), whereas other combos would ruin one or both materials - which we obviously want to avoid.

For more details about the sensory supplies pictured, please visit this post.
I loved the idea of the kids getting to draw on the walls in the Art Room. I was originally planning to do chalkboard and whiteboard paint, but the cost was pretty prohibitive and it would be harder to "undo" once we someday (though not anytime soon!) move. So I went with whiteboard adhesive decals here. I bought these circles precut because I do not trust my ability to draw/cut a nice looking circle. However, sheets of whiteboard adhesive are pretty cheap, so if you are more skilled (and more patient, hahaha) than I am, that's a great way to do it. I LOVE the whiteboard adhesive. It is seriously great - very high quality and nice and thick. It honestly feels just like you're writing on a real whiteboard! These circles (in white, green, and blue) run along the whole cement wall. They're a great way to "draw on the walls".

Pictured:
On the left side of the room, we used chalkboard adhesive to make a chalkboard for more opportunities to "draw on the walls". The chalkboard adhesive was much flimsier, difficult to mount, and overall is lower quality when compared to the whiteboard adhesive. It is significantly cheaper than doing your own chalkboard paint (in particular because I've heard you need several layers before it's really nice), but it isn't as great. Honestly, though, S doesn't really know any better and she has a great time with it, so I wouldn't say it's not worth doing - just know that it will not feel/look the same as an actual chalkboard. (Sorry for the terrible photo) Above the chalkboard are tissue poms that I made by hand while really pregnant. They were incredibly tedious to fluff - so be forewarned if you are thinking of making some. I'd originally wanted a really cool swath of them in various sizes and color on the ceiling, but for whatever reason, it was impossible to get anything to hang without using something very serious - like a huge nail - so we changed our plans and hung them on the wall. They still give the room some added color, and I do like that this way they look like flowers, but still I'm a little sad about my missing ceiling decor. :)

Pictured:
I really wanted the Art Room to be accessible to S, so we made sure to install shelving that is low to the ground. As is our general parenting motto, we trust S to make good decisions (there are logical consequences when she does not - but we feel that mistakes can be great ways to learn) and so she has free access to all but the very top shelf of materials (those are mostly kits or materials that I am saving for a different time). That means that she has free access to scissors and glitter and paint and has since she was a toddler. :) This system works really well for us - so that's the story behind the placement of the shelving and supplies.

Pictured:
All shelving from in-stock Home Depot shelving supplies
Blue and green stamp buckets from the Dollar Store
Jars with various supplies from Ikea
Here she is gathering supplies for the project she's working on.

And a different angle of her grabbing supplies.

All of her pens/pencils/crayons/chalk/etc are stored in hanging buckets. I felt that these materials would easily be (accidentally) knocked over if they were on shelves. The buckets are sorted by type (though we do have two crayon buckets) and S takes whatever buckets she needs for the project at hand. The rule in the Art Room is that you may grab as many things as you need, but you are responsible for putting everything back in its place when you are done (when she was 2-3 years old, I would help her do this - but now at 3.5 years old she's pretty self-sufficient). I made the star decorations with a star punch from Michaels and leftover paint sample cards.

Pictured:
Hanging buckets from Michaels
The art table itself is actually two tables that we've placed next to each other. I've covered them with our favorite mess containing material - white oilcloth - and secured the oilcloth to the tables. The oilcloth is thick enough that there isn't really a seam between the tables and it does a pretty good job of keeping the tables together. We also recently got a butcher paper dispenser (for Christmas from her grandparents) and we LOVE it. I really recommend getting one if you have the table space because it's immensely useful.

Pictured:
Butcher paper roll/dispenser from Ikea
Just like in the playroom, I used different colored chairs to bring more color to the room.

Here's a zoomed out shot of our shelving. We did end up using some ground space because I like to have everything spread out and easily accessible. You can also see that we use the wall opposite the cement wall to display her artwork. I wanted a nice (but economical) way to display some of our favorite artwork, so I settled on using thick black masking tape. I use it to make a "frame" around the art (or in the case of her smaller spin arts - I make a sort of quilt frame around a group). It's very fast, cheap, and I think it looks great!
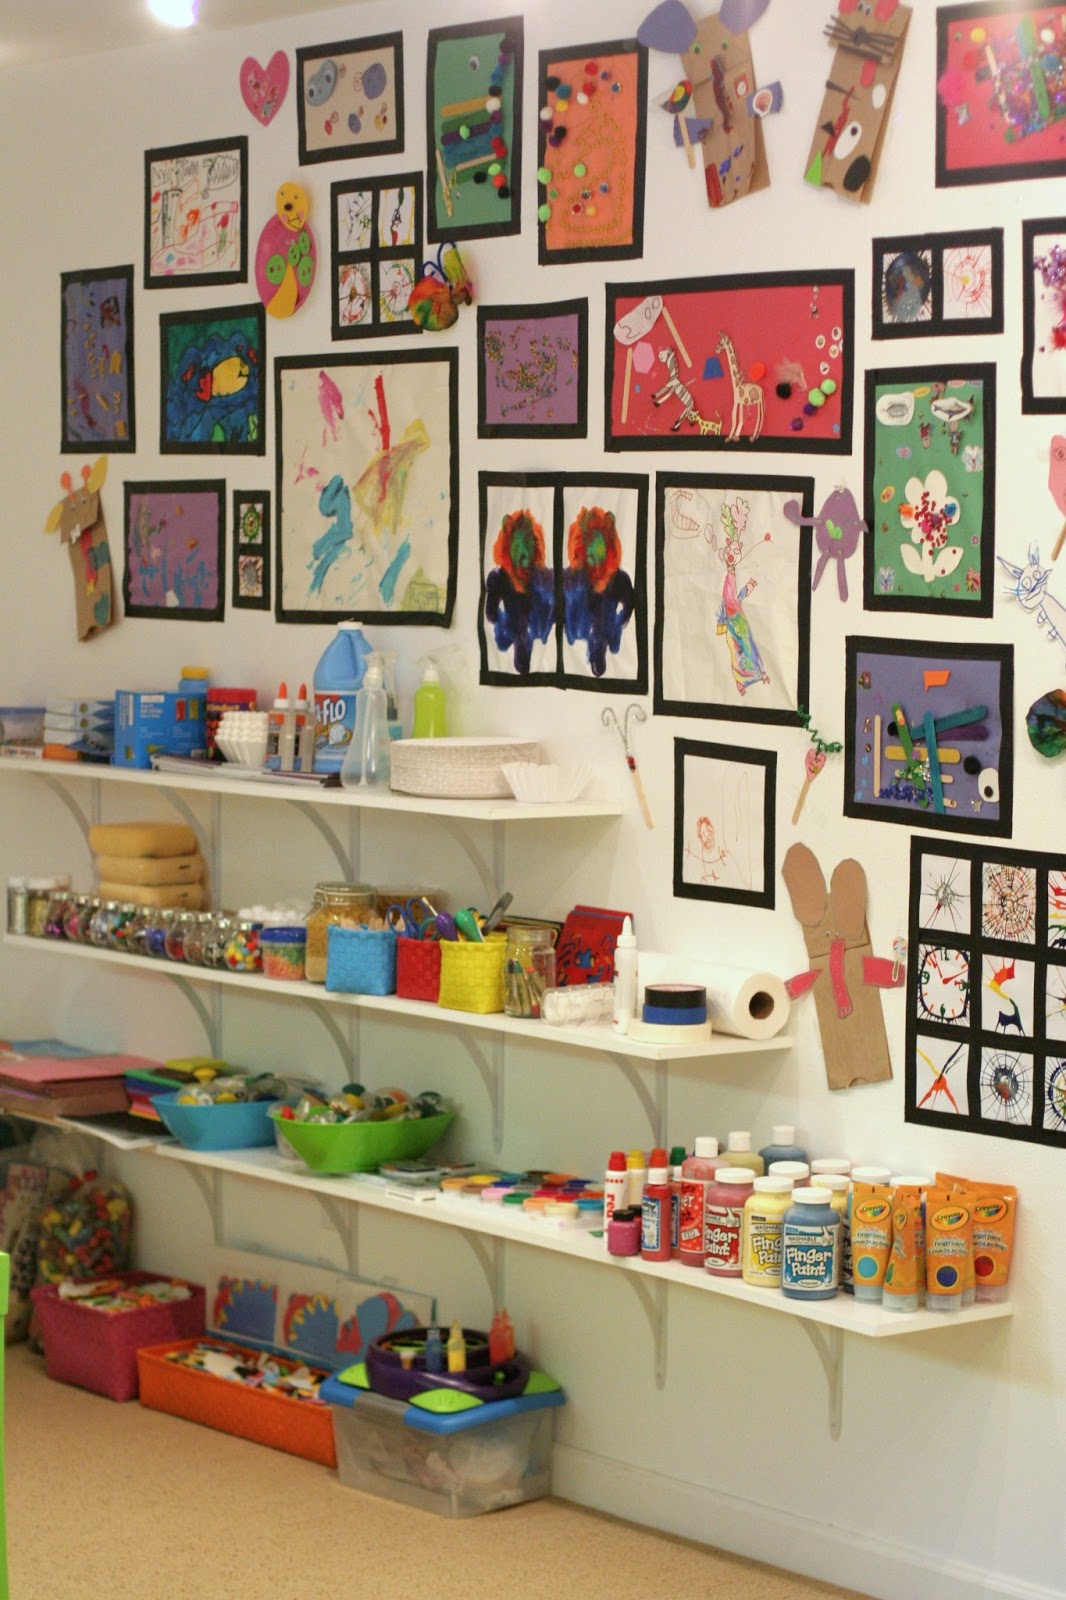
Pictured:
Miscellaneous art supplies
Here's S in front of the continuation of her artwork display on the other side of the door (opposite the shelving).

Above the cement wall, there is a small amount of "normal" drywall and the cement actually makes a ledge, so I used the space to hang the word "CREATE" and to display some of her handpainted figures/fossils/etc. I bought the letters at Michaels and bought a small sample of green paint that matched the green chair in the room from Home Depot to paint the letters.

The final thing in our Art Room was not intentional, but when you live with cats who love to destroy inflatables, you do what you have to do. When she was smaller, S had an inflatable baby pool with about 100 balls and we set up a Little Tikes slide that landed in it. It was one of the most coveted things in our playroom when she was 2, but our cats ultimately popped the pool so the balls had a hard time staying in, etc, etc. Not to mention she got so tall that the baby slide was simply too short! So her big Christmas present from us was a new ball pit. To keep this one safe from the cats, we needed to put it in the Art Room (because the Art Room is off limits for the cats anyway since they are always knocking things over, getting into the sensory materials, etc). Now that it's been there for awhile, I have adjusted to it a bit more. I do like that it adds color and it's nice to be able to take a break to play in between art projects or while you're waiting for something to dry. I don't know that I would have intentionally included a ball pit in my original design, though.
")
Pictured:
Hopefully I've given those of you looking to set up an art space some ideas!
You can read about our favorite art supplies here.
Follow along with Fun at Home with Kids on Facebook, Google+, Pinterest or Subscribe by Email or Bloglovin'!
All activities here are activities I feel are safe for my own children. As your child's parents/guardians, you will need to decide what you feel is safe for your family. I always encourage contacting your child's pediatrician for guidance if you are not sure about the safety/age appropriateness of an activity. All activities on this blog are intended to be performed with adult supervision. Appropriate and reasonable caution should be used when activities call for the use of materials that could potentially be harmful, such as scissors, or items that could present a choking risk (small items), or a drowning risk (water activities), and with introducing a new food/ingredient to a child (allergies). Observe caution and safety at all times. The author and blog disclaim liability for any damage, mishap, or injury that may occur from engaging in any of these activities on this blog.


Wow! Your overall play space is amazing. Thanks for sharing!
ReplyDeleteThank you, Mama D! :)
DeleteThat ball pit and slide are so cool! I love the idea of having art materials accessible to kids. They are so hard to get where we are that I haven't done that but I would like to set up something like you have here with at least the supplies that are readily available or that we can make. I love the way you have transformed your space and I can't wait for your outdoor post. Well done!
ReplyDeleteThank you! We love the ball pit. Especially X! It's one of his favorite places. :) I can't imagine - for sure everything is MUCH easier for us! Garage sales, free shipping, stores! You do such a great job with the limitations. I am very impressed with how much you do with your girls!!!
DeleteHow many balls are in your pit Asia?
ReplyDeleteA whole LOT. It was rather shocking to see how many bags of 100 balls we needed to fill it. I suspect somewhere in the neighborhood of 800-1000 balls are in there. Gulp. I stopped counting because it got a bit expensive. When we had the kiddie pool 200 balls was a fabulous amount, but this one is REALLY big.
DeleteI have become obsessed by this idea and currently can't leave the laptop - madly googling for the cheapest prices!!! Should really be sewing instead ....
DeleteHahaha, it's so fun, though, Rachael - you won't regret it! If you get regular play balls (not the phthlate free balls like we did) they are about 1/3 the price!
DeleteI absolutely love all these ideas! We're in an apartment now, but I'm saving up DIY projects for when we move and our LO is old enough to get into this stuff. Right now, he's more concerned with scooting.
ReplyDeleteThank you, Sasha! So fun, and hey, scooting is serious business. ;)
DeleteWhat an amazing space!!
ReplyDeleteThank you, Kat! We love it!!! :)
DeleteI absolutely love this! I do have a question though. How do you go about your day with several different play spaces, and two kids? Do they (or at least S) ever play in the rooms alone, or do you and X always go with her? Especially if they each wanted to be in two different areas. I seem have trouble keeping up with two kids and a playroom, and the rest of the house, as it is, lol. I hope that question made sense :-)
ReplyDeleteHi Amber! That totally makes sense! Well for now, I go where X goes. S is great with minimal supervision - she follows the rules just fine. So far, with rare exception, they want to be in the same room! I hadn't really realized it until just now. I suppose maybe as they get older their tastes will diverge more, but I suspect until he's more trustworthy/older, I'll be watching/in the same room as him. :)
DeleteHi, I came across your blog and absolutely fell in love with the ball pit! Santa is definitely brining one this year! How many packages of balls did you have to purchase to fill the tub?
ReplyDeleteAw, thank you so much! YAY! I will admit that it was a bit crazed how many balls it took to fill the ball pit. I actually lost count, but I do believe it was in the range of 800-1000 balls. It is a HUGE pool. When we had the little kiddo version (with a baby pool) it only took 200 - so I'd suggest limiting the size of the pool if you don't want to buy a jillion ball pit balls!
DeleteDo you know what size your art supply metal pails are, and also where did you get the white hanging rack you used to hang them on??? Thanks!! Your rooms are just AMAZING btw!
ReplyDeleteShoot - I don't. I bought them at Michaels (a craft store), so I have no idea what the size is. Sorry! And the white hanging rack we made ourselves. Some white floor trim cut to size, drilled it and then screwed in the hooks - we got all the stuff for it at Home Depot (a home renovation store). I hope that helps! And thank you!!!!
DeleteDoes the black tape pull off the paint when you remove it? I love the idea of the tape instead of sinking money into tons of frames! My little ones love creating art by the truck full as well :) I am just curious if that tape is like painters tape or is it stickier?
ReplyDeleteThanks,
Tracy (at busyandthebeans.blogspot.com )
Hi Tracy! Yes, it is very similar to painter's tape! I can't guarantee anything, but at least at our house after over a year, you can easily peel back the tape and it takes no paint with it. Hope that helps!
DeleteThe black masking tape is brilliant! I love that idea, I'll have to try it!
DeleteI'm a kindergarten teacher and another system that works GREAT in my classroom is to cut a rectangle of cardboard (3x11") for each kid and hot glue two clothespins to it so the bottom of the clip just hangs off the bottom of the cardboard. Each child painted one and we put names on them, and I hung them on the wall with thumbtacks- spaced so that there's room for paper to hang either portrait or landscape orientation. Switching out the projects on display takes less than five minutes!
Love it! That sounds so cute - and super easy!
DeleteYou are officially my new hero! My little guy is 2 and quite honestly doesn't enjoy playing with his toys anymore. In search of more entertainment for him I found your website and have a new found love for art! I love your art room as well! So perfectly organized! Thank you for all of the awesome things you post on your website (:
ReplyDeleteHooray!!!!! I'm so glad to hear it. Thank you for taking the time to leave such a lovely comment! <3
Delete