
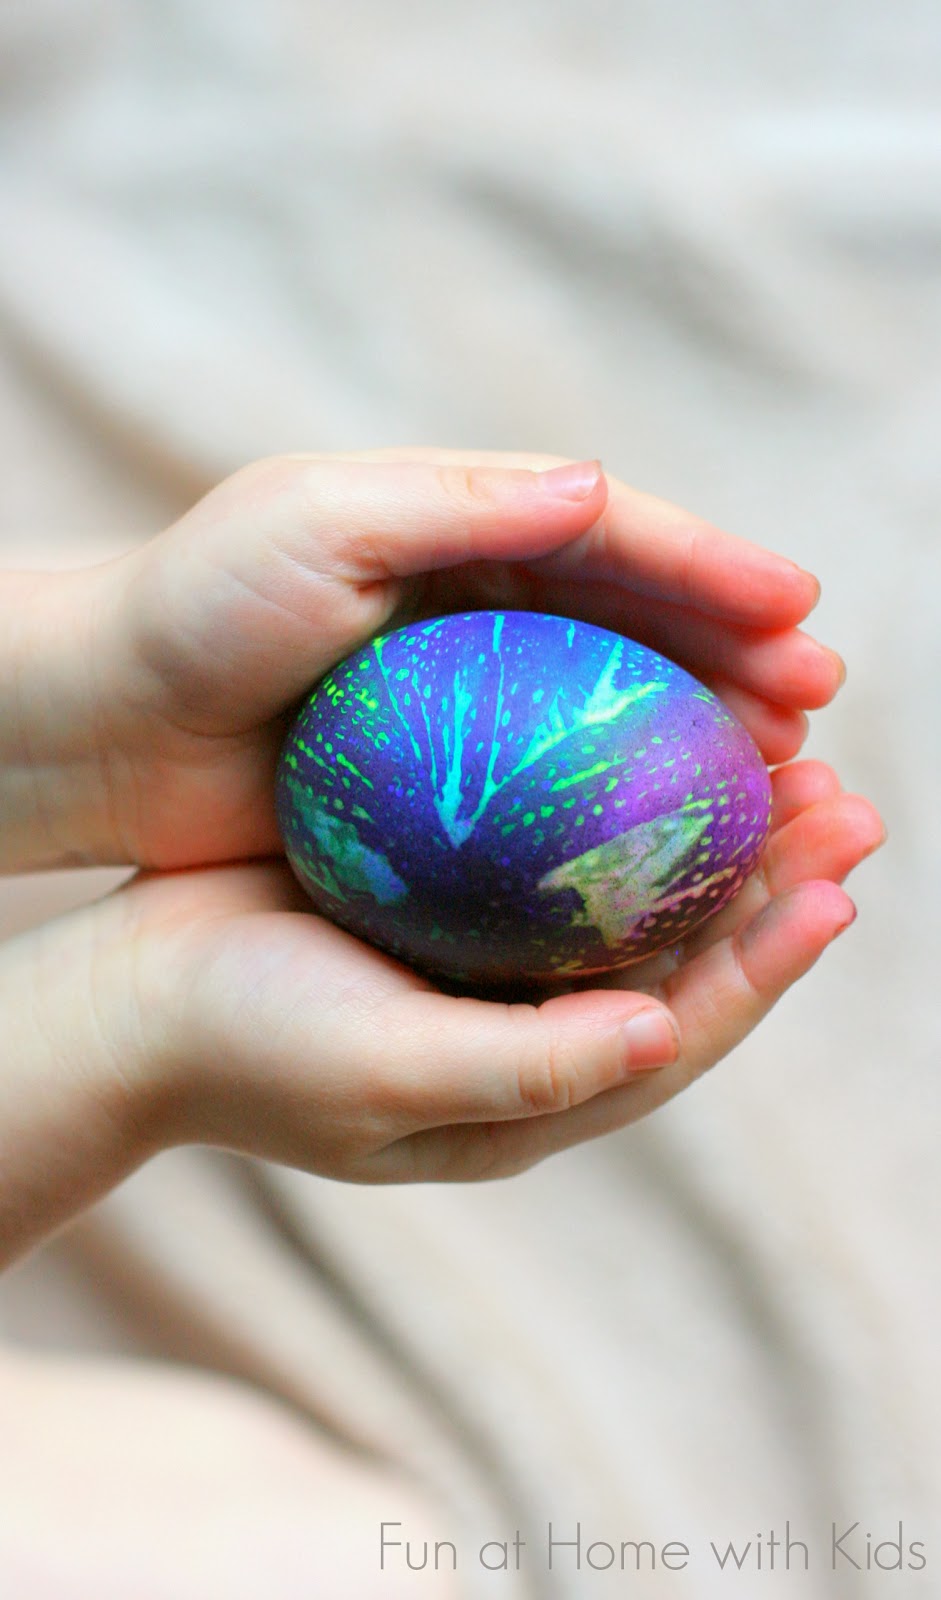
S's preschool is having an Egg Hunt and has requested that S come with a dozen hardboiled dyed eggs. Since S and I would both get bored doing the same thing 12 times over, we decided to try three different ways to dye our eggs. Up first are Tie Dyed Eggs. When I saw them here, on Mom2PoshLilDivas, I just knew we had to try them. They are really unique - I just love the pattern the paper towel leaves behind. It reminds me of skyscrapers or some sort of cityscape.
To make Tie Dyed Eggs, you'll need:
Hardboiled Eggs
Paper Towels
Food Coloring
Vinegar
Spray Bottle
Plastic Bags
Rubberbands/Ties
To give the eggs our own twist, we decided to use our favorite Neon Food Coloring :
:

We used the plastic lid off of a disposable pan S uses sometimes for sensory play since I didn't want to risk the food coloring dyeing anything else of ours. We have half-sized paper towels, and those were actually big enough for the eggs we had, so we assigned one half paper towel per egg. It was easy enough to fit two in the tray at once, so S set to work designing the patterns for our first two eggs.

You can completely cover the paper towel with food coloring or you can leave white in between. We tried one paper towel with more spacing between the food coloring drops (not shown below) and the other three S really wanted to completely cover with food coloring - so that's what she did!

Once you have the paper towels covered to your preschooler's standards, you mix a few teaspoons full of vinegar and some water into a spray bottle and spray the mix evenly over the paper towel. We made sure that it was covered with the mixture, but not dripping wet.

Ah, she's getting so big! The last few times we'd tried the spray bottle it was too hard for her (probably in part because our spray bottle is from the Dollar Store and a bit tough to squeeze), but now she's really getting the hang of it. I did help a bit to make sure that there was even coverage of the vinegar/water mixture.

Once your paper towel has been sprayed down with vinegar-water, place the egg in the middle and gather the paper towel around the egg tightly. Use a rubberband to secure it. Then place the rubber-banded paper-toweled egg into a plastic baggie and rubberband that again.

They were a little drippy, so just to be safe, we put them back into the plastic tray to "marinate". Apparently the longer they soak, the brighter the colors. We let ours sit for about 4 hours.

Fair warning - if you don't use gloves, your hands will look horrible afterwards. Seriously. My fingernails are black. Whoops. At least I had the foresight to be the one in charge of wrapping the eggs so S's hands were (mostly) spared!

They are just so cool looking! S and I are big fans of this method of dyeing. It's pretty foolproof and flexible - the paper towels that were soaked with dye made fabulous eggs and the paper towel with spaced out drops of dye also made a fabulous egg! You can't go wrong!

You can find all of our Easter activities here!
Follow along with Fun at Home with Kids on Facebook, Google+, Pinterest or Subscribe by Email or Bloglovin'!
All activities here are activities I feel are safe for my own children. As your child's parents/guardians, you will need to decide what you feel is safe for your family. I always encourage contacting your child's pediatrician for guidance if you are not sure about the safety/age appropriateness of an activity. All activities on this blog are intended to be performed with adult supervision. Appropriate and reasonable caution should be used when activities call for the use of materials that could potentially be harmful, such as scissors, or items that could present a choking risk (small items), or a drowning risk (water activities), and with introducing a new food/ingredient to a child (allergies). Observe caution and safety at all times. The author and blog disclaim liability for any damage, mishap, or injury that may occur from engaging in any of these activities on this blog.


Those look gorgeous!
ReplyDeleteThey really are! Who would've thought a paper towel could create such interesting and intricate designs, right?
DeleteThese are amazing, found them via craftgawker, they look like some magical eggs from space!
ReplyDeleteHahaha - Yes, totally!
DeleteI put tin foil under the paper towel so when you lift it up to wrap the egg your hands don't get color on them. The eggs really are beautiful!
DeleteOhhh, that is a fabulous solution, Debbie! Love it!
DeleteOhhhh trop jolis !!!
ReplyDeleteMerci!!! :)
DeleteWhat a great way to change-it-up. My son wanted us to get him the kit from the stores to dye Easter eggs but this will make it get over it quickly. Thanks so much for the wonderful ideas. They are always so much fun.
ReplyDeleteI hope you guys have fun with it, Jazmin! Thank you!!!! :) :) :)
DeleteMy 3 year old son created some beautiful eggs at his Steiner playgroup using water and vinegar but as a 'paste' to stick on strips of tissue paper to eggs. Once the paper has dried they peel off to create a similar tie dyed effect and the colours were gorgeously blended.....
ReplyDeleteOh that sounds so beautiful, Janine! We'll have to try that - I am sure S would love it!!!
DeleteShared this today on my FB site. These look beautiful - can't wait to try them with my 2.5 year old son!
ReplyDeleteThank you so much for sharing them, onetimethrough.com!!! :) :) :)
DeleteAre these eggs edible afterwards?
ReplyDeleteIF you are very mindful about how long they are kept at room temperature (we kept ours at room temperature for HOURS), you are only using food coloring and vinegar, so it shouldn't be a problem. But you would need to be careful that they were in the fridge a lot more than ours were in the steps above.
DeleteWhat do you do after you take them out of the plastic bag?
ReplyDeleteYou can let them air dry on a paper towel if they are still wet. Ours were pretty dry after sitting that long. :)
DeleteWhat size bag did you use? How many eggs do you put in one bag? Do you need to separate the eggs? If so, how? I want to try this, but always have an issue with the eggs cracking in years past!
ReplyDeleteZiploc sandwich baggie and one egg per bag. I placed all the baggies together in a tray. Hopefully that helps! Are you hardboiling them first? If you do and keep them separated they (hopefully) won't crack.
DeleteWhat is the ratio of vinegar to water?
ReplyDeleteHm, I didn't measure. I think maybe 4 teaspoons of vinegar for every 1/4 cup water?
DeleteWe did these today and they came out so lovely --I was really surprised. There is not much control but so much fun to see things of such beauty. I forgot about the plastic bags, that would have helped on the fingers. I used gloves and just wrapped the wet paper towels around the eggs and that worked fine. I also first blew some of the eggs so that we can keep them (and did some hardboiled). And I painted the empty eggs with modge podge which left them shiny.
ReplyDeleteOooh! Good idea with the mod podge!
Delete