
I love thinking of creative toys for kids. My kids always seem to love the DIY stuff we make for them and they are both big on sensory play. So it's no surprise that we love sensory boards here at Fun at Home with Kids. Once you've checked out the two versions of sensory boards we share here, you might also want to see our Outdoor Music Sensory Sound Wall and our Kid-Made Nature Sensory Board for babies.
+(1).jpg)
X already has a lot of traditional baby toys that he inherited from his sister, so for his Christmas presents, I wanted to "think outside the box" a bit.
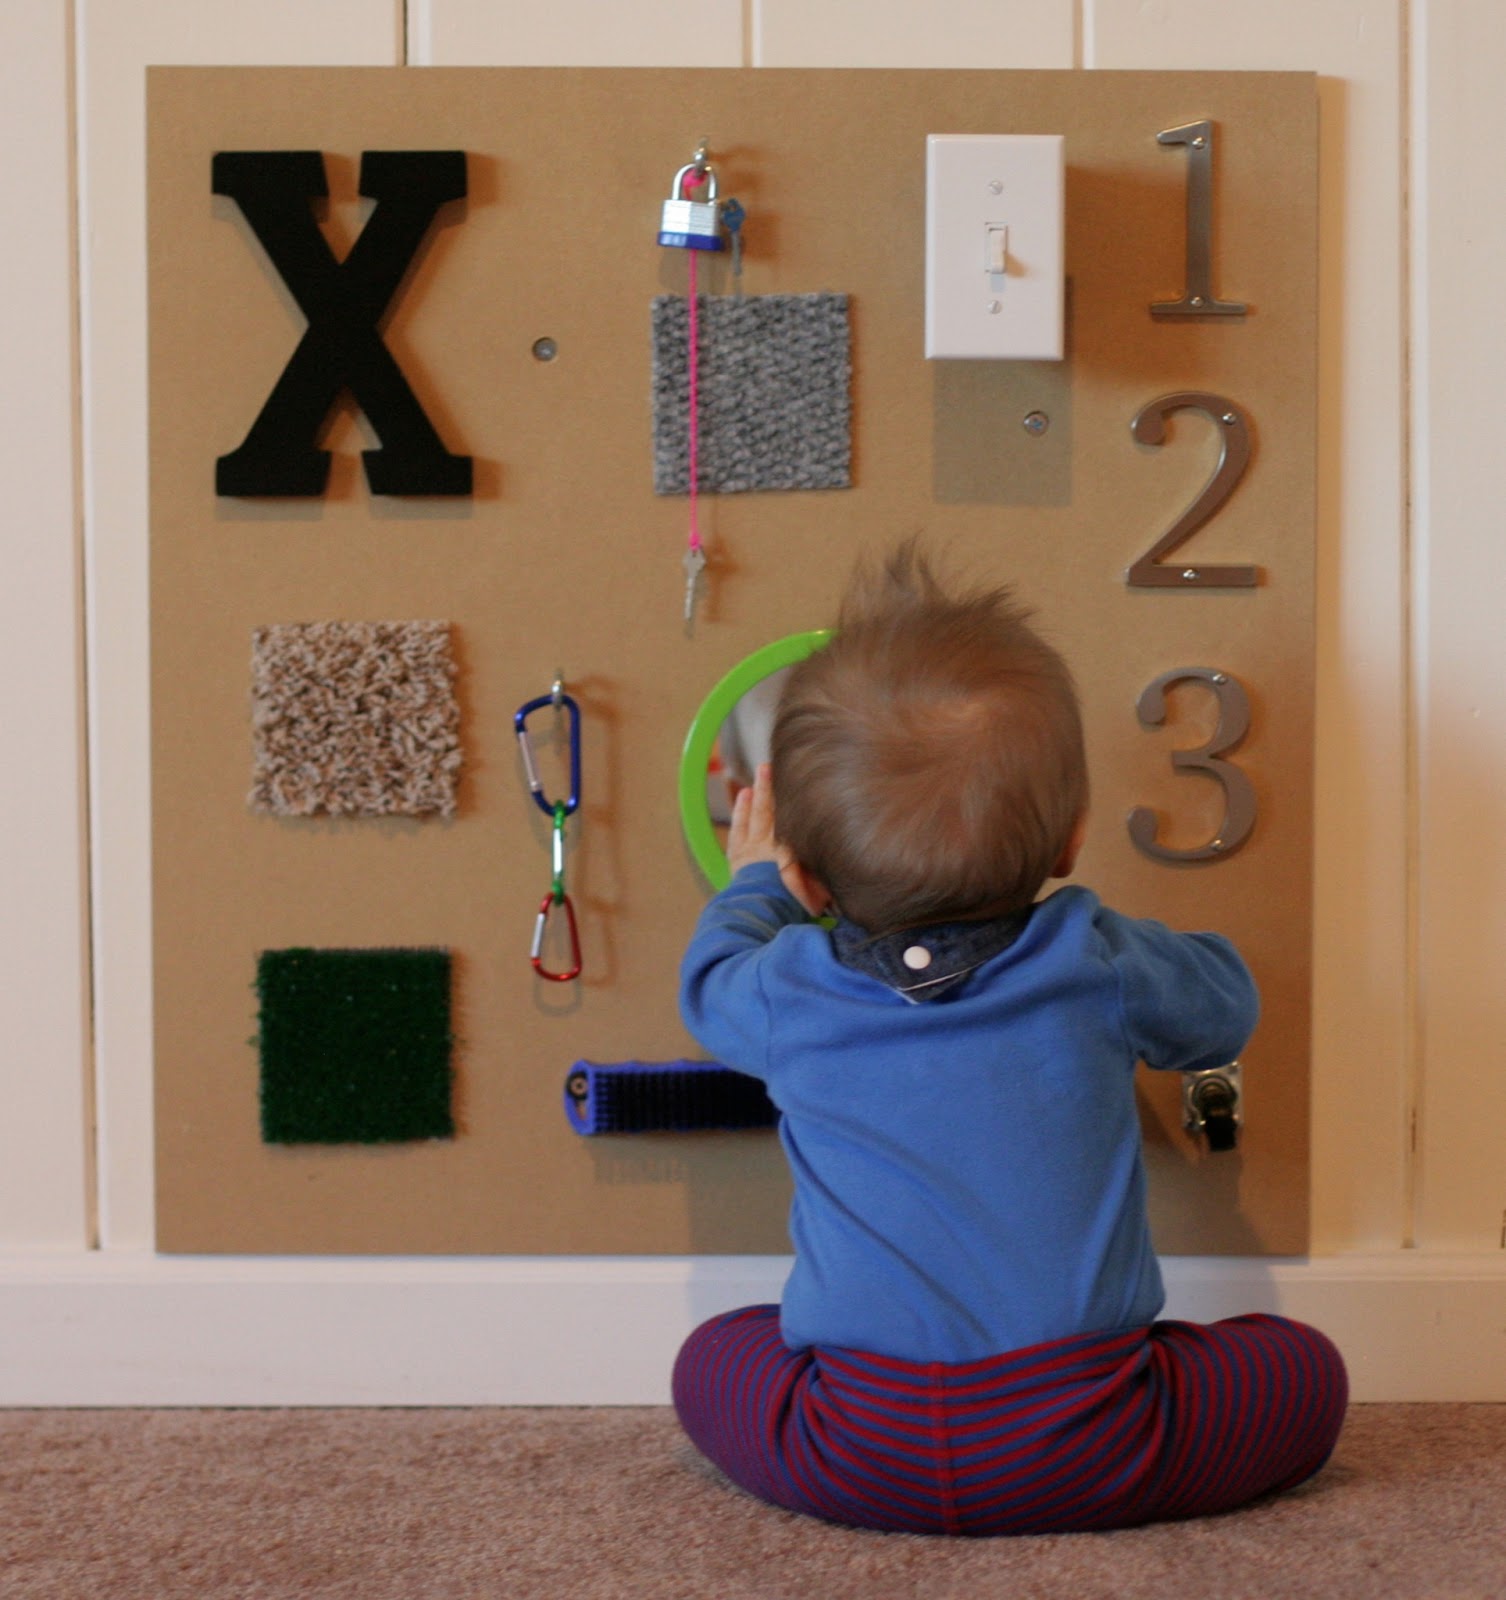
For the first present, I decided to make two sensory boards that hung on our walls, close to the ground, so that they could easily be reached by a sitting baby. Since part of the board would be too high for a sitting baby - more appropriate for a standing baby or older child, I decided to incorporate items that big sister would find interesting/challenging, as well as some items that would intrigue a toddler (for when X is older). I went to the Dollar Store and Home Depot and searched the aisles for buttons, switches, locks - anything that might be engaging for a baby and beyond.
The boards themselves are made from a single precut piece of MDF. You can find these in the lumber section of Home Depot. While there I had them cut the board in half (these put together are the size of the prefab boards). We hung the boards with wood screws to make sure that they would be very secure. Other items are mostly mounted with screws, though the texture blocks (free samples from Home Depot!) and the mirror are mounted with hot glue.

When he first got his presents at Christmas, X's favorite things were the texture squares, the mirror, the touchlight (we need to turn it on for him), and the dangling chains (he loves the sound of them). Since then, he's already expanded his repertoire to spinning the wheels and is showing a lot of interest in the lower light switch and the door chain (which he's seen big sister succesfully manipulate several times).
S loves helping him turn on the touchlight, and showing him all the different locks she can do. At first she couldn't unlock all three carabiners, or the keyed lock, but now she can do both! The only remaining item that challenges her is the combination lock.

Affiliate links included for your convenience.
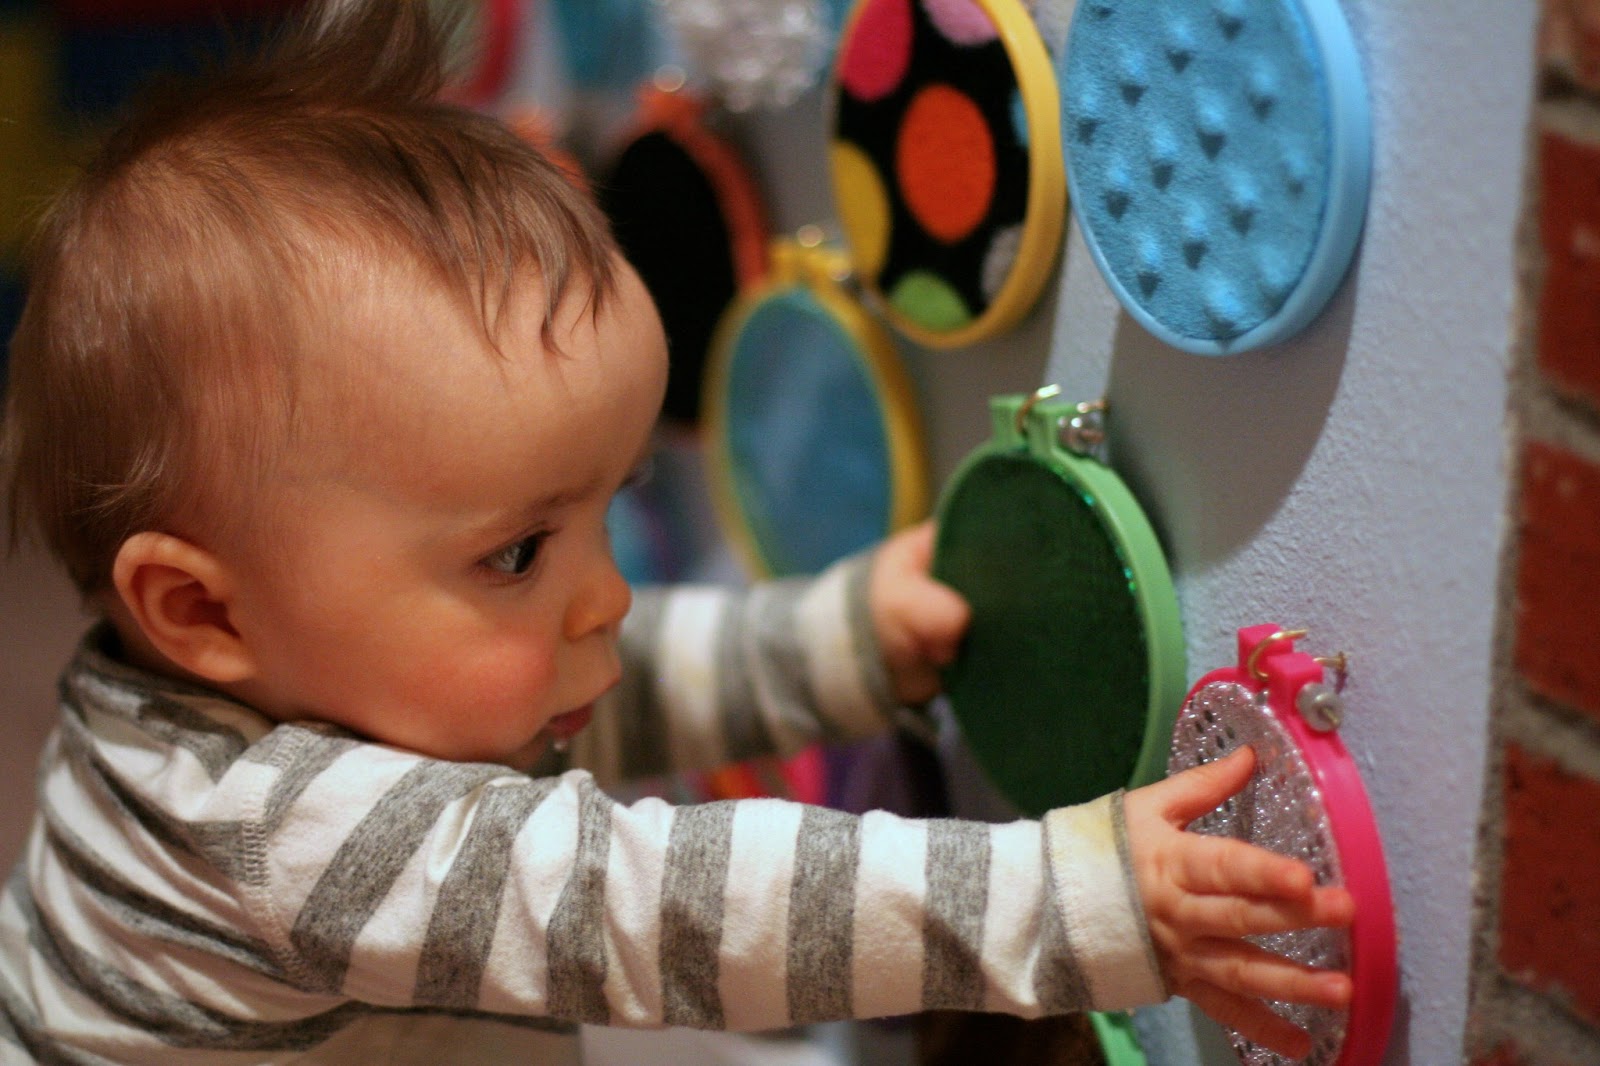
Since X is very interested in textures, I also decided to make a feeling wall for him. I went to a fabric store and shopped just by feeling (it was actually pretty fun - though my cart looked a bit insane by the end!). I found some multicolored plastic embroidery hoops and used them to display the different fabrics. While he's touching, we give him the words to describe what he's seeing and feeling ("rough", "sparkly", "bumpy", "shiny"). This is another good way to incorporate an older child - as they can help explain the textures to their younger sibling.
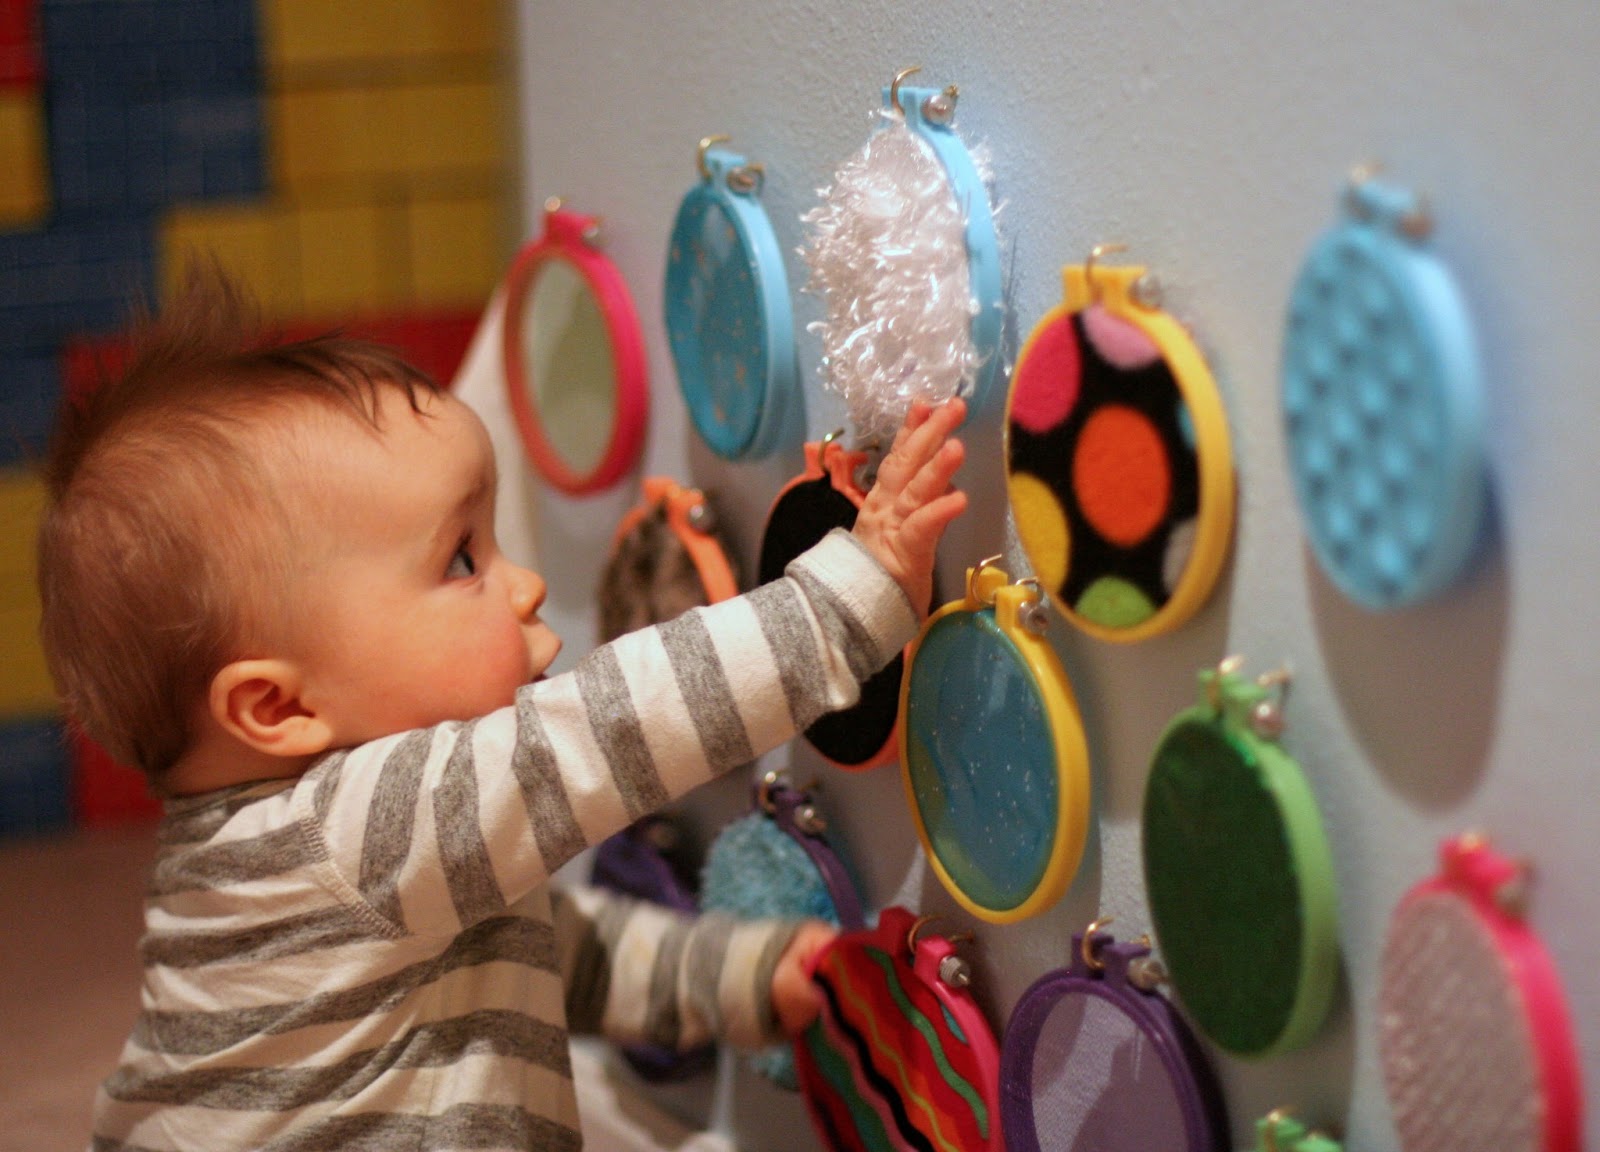
Though I initially hung the fabric hoops directly to the wall, I've since upgraded to mounting them to another MDF square as I feel they are more secure that way, so I would suggest going that route initially if you are planning on making something like this.

I incorporated S into this wall by cutting small squares of each fabric and putting them into a large drawstring bag (you can just make it out in the below picture behind X's head). We play a game where she picks a fabric circle, and then with eyes closed, she uses her hands to feel around in the bag and find a match. It's actually fairly challenging with some of the fabrics!
Though I enjoy the look of the embroidery hoops, you can certainly just use fabric swatches, or mount them to cardboard, etc, as the method of presentation. I really liked the idea of a wall mount to encourage X to explore with his eyes and his hands vs. just his mouth (which I felt like he would be prone to doing if I just handed him swatches).
You can see more of our playroom in this post on Designing Playspaces: Our Playroom.
You can see more of our playroom in this post on Designing Playspaces: Our Playroom.


Follow along with Fun at Home with Kids on Facebook, Google+, Pinterest or Subscribe by Email or Bloglovin'!
All activities here are activities I feel are safe for my own children. As your child's parents/guardians, you will need to decide what you feel is safe for your family. I always encourage contacting your child's pediatrician for guidance if you are not sure about the safety/age appropriateness of an activity. All activities on this blog are intended to be performed with adult supervision. Appropriate and reasonable caution should be used when activities call for the use of materials that could potentially be harmful, such as scissors, or items that could present a choking risk (small items), or a drowning risk (water activities), and with introducing a new food/ingredient to a child (allergies). Observe caution and safety at all times. The author and blog disclaim liability for any damage, mishap, or injury that may occur from engaging in any of these activities on this blog.


I love how you presented the fabric swatches. What a fantastic idea to use the hoops!
ReplyDeleteThank you! I was so excited to find brightly colored plastic hoops - they just seemed perfect for it!
DeleteWhere did you find the hoops? I saw some at one of our craft stores but it was more than I wanted to pay (I'm making one of these for the daycare where I work and the money comes from me). For now I've bought some of the wooden ones to see just how interested they will be in it.
DeleteAlso can you tell me how you attached the push light to the busy board?
DeleteHi LaDonna,
DeleteI got the hoops from Create4Less - http://www.createforless.com/Bates+Embroidery+Hoops+Hoop-La+4/pid69976.aspx. I bought more than 6, so they were $2 each. I bet you could cut circles (or squares) of fabric and use a hot glue gun to mount them on some MDF board for less. The embroidery hoops add a bit of cost to the project, for sure.
The push light was from the Dollar Store and it has a hole in the back for mounting. I screwed a screw into the MDF and mounted it on the screw. You can knock it off if you wiggle it enough (X just figured this out today, in fact!). I bet you could also use hot glue if there isn't a hole for a nail/screw on the back of your push light (I used hot glue to mount the plastic mirror on the other board). Hope that helps! Let me know if you have any other questions. :)
Wondering if you could use some velcro adhesive to add a little more security to the light at the bottom, so it wouldn't be so easy to twist it off?
DeleteThank you for the great ideas! I have a HUGE space to create an awesome playroom, and your site will certainly come in handy! :)
That's a great idea, Erika! I think that would totally do the trick!!
DeleteAnd AWESOME news! I bet you'll come up something amazing!!!!
Traveling Cupcake - I just looked and it's AWESOME! What a great idea to make it into a table. Just fabulous!!!
ReplyDeleteThis is absolutely one of the best ideas I have seen, so wish I would have thought of this when my babies were babies! Brilliant!
ReplyDeleteThank you, Carisa! You are always SO NICE! :) X loves tinkering with his boards, and I love the added decor - I will be sad when he outgrows them!!!
DeleteAwesome! Thanks Christa! I'm so glad it was a hit. :)
ReplyDeleteSnap! - I'm in the middle of planning both of these activities for my stepson! (He's 6, but has been diagnosed with autism and has definite sensory issues and is a bit slow with fine motor skills).
ReplyDeleteI love how your sensory boards turned out - I'm planning on a touch and feel book with my fabrics, but I'm hoping my locks/hinges/latches board works as well as yours :)
Ooh, I love the idea of a touch and feel book - that'll be fab! And thank you - I'm sure they will. So many fun locks and other things to choose from, right?
DeleteThese sensory boards and your photos are wonderful! I'll be featuring this on The Crafty Crow!
ReplyDeleteOh hooray!!!! I have been hoping to get something on to your beautiful site, Cassi! I am THRILLED! Thank you!!!!!!
DeleteHi Amanda! Thank you for passing along that info. If anyone is concerned about using the MDF, you could just as easily purchase plywood from Home Depot and have them cut it to size there (as we did for the MDF). I'd recommend sanding the edges if you're using plywood - but everything should mount just as easily and wood screws would still work for mounting! :)
ReplyDeleteI love these ideas! You have presented them beautifully. I know what our little man will be getting for Xmas this year :)
ReplyDeleteThank you so much, Kylah! They are still beloved almost 8 months later! Hope your little man loves them as much as ours has. :)
DeleteHello from Cambridgeshire, UK :) I've come across this post as I'd had the idea to do a sensory display board at my nursery and was just looked for cool things to add to my collection! I love your boards and will be keeping an eye on your page for more great ideas! :) x
ReplyDeleteHi Lucie!
DeleteHow fun! I'm so glad you found us!!! :) :) :)
Silly question...how did you mount the light switch? Don't they usually have to be set into the wall/
ReplyDeleteNot a silly question! It's actually hard to see from the photos - but if you look at the third photo down, you can see the blue box that the electrical usually goes in sticking out from the wall. We just mounted them on the box - so they pop out. It was the best solution we could come up with for them!
DeleteI love these ideas! I'd like to make the sensory hoops for my little boy- how did you attach the material to the hoops? They are beautiful!
ReplyDeleteHi Creatormade,
DeleteThere may actually be instructions in with the embroidery hoops, but basically they're made of two circles that fit into each other. You put the fabric between the two and pull it taut as you tighten the outer circle (there is a screw at the top for tightening). Hope that helps!
I was googling 'sensory boards' and came across your page! I love your ideas and the presentation of the fabric wall! I have a fire place I am trying to cover the opening to in a creative way as my 7 month old is getting more active! I think this is a gorgeous way to go about doing it! Thanks for the idea :)
ReplyDeleteWAHOO! I'm so super psyched that you found me by Googling! YAY! For a looooong time I was like 6 pages back in results. Ha! Thank you so much and I'm so glad you love it. Hope your little one loves it as much as ours have! :)
DeleteHi Asia did you seal the MDF? is this something to worry about? I have just had MDF cut and collected all the bits I need to make your fab boards for my boys, do i really need to seal it?
ReplyDeletelove all your ideas!!
thank you
Hi Carina! I did not, but it's totally up to your discretion!
ReplyDeletegreat thank you! wil post you a pick of our finished boards! :)
ReplyDeleteOh I would love that, Carina!!!!
ReplyDeleteHow did you mount the light switch to the sensory board? I haven't figured out how to remove the black base to make it flush with the board like you demonstrate.
ReplyDeleteI'm so sorry, Charles! I thought I'd responded to this! EEK! They are not flush - they actually stick out. The kids don't mind a bit though. I think you'd have to hollow out the wall behind them or cut off part of the box if you didn't want them sticking out. Either way sounded like more work than we were interested in, so they just sit out a ways. :)
DeleteYour sensory boards were part of the inspiration for making my son's busy board! I mentioned you on my blog: http://naptimerumination.blogspot.com. Thanks for all the great ideas!
ReplyDeleteIt turned out totally awesome, Trisha! Fantastic job and thanks for the link! :)
DeleteHands down, these have got to be the best sensory boards I've ever seen! How cool!!
ReplyDeleteThank you so much! What a lovely compliment! Thank you, Kay! :) :) :)
DeleteWhat is the blue and black bar on the bottom of X's board? The kids and I hit up Home Depot today to make our own boards! So excited to put them together. :) I might blog about them when I'm done & I'll be sure to direct people here for the idea!
ReplyDeleteHi Bethany! Awesome! That is actually a bristled brush we got at the Dollar Tree. Our boards are about half Dollar Tree half Home Depot. :)
DeleteWould love to invent a way for the board to rest on the floor and lean up against the wall. I have tile floors and am not ready to permanently install this board, but i can't wait to make one!! I was thinking about something like a long rubber strip that has a deep 'notch' in it that a board can just rest in? Of course this wouldn't be safe around bigger children but for now mine is 6 months old.
ReplyDeleteHmmm. Maybe you could do one on a lighter plastic board that suctions to a glass door? Or you could make smaller floor based boards (think like the Melissa and Doug latches puzzle) or maybe you could make a sandwich board? Let me know what you end up doing! I'm sure lots of people have a similar problem!
DeleteLove all your ideas! Making them all! I was wondering how you attatched the embroidery hoops to MDF to make them more permanent?
ReplyDeleteThank you!!! I just twisted the hooks into the MDF. A reader suggested using sticky-back velcro - I think that would work perfectly since the hoops are so nice and light. Hope that helps!
DeleteThis is like the best and its pretty too. Wow wow
ReplyDeleteThank you so much, Isabelle! :)
DeleteOMG! I can't wait to make these for my 8 month old twin girls! They are going to love them! I've been looking into buying some new cause and effect toys to satisfy their new desire to explore the world around them and these will be WAY better than any toy I could purchase. Thanks for the great idea!
ReplyDeleteOh perfect!!! And seriously - I am impressed that you can type anything coherent with TWIN 8 MONTH OLDS! I hope they love them!!!! :)
Deleteok so i thought i typed a comment; but now i cannot see it {sorry if this is a repeat!}. i am currently planning my second baby's nursery and would love to make the sensory hoops! was wondering what you used for the slippery, shiny looking "fabrics"? i am stationed in europe and don't have access to a fabric store to go and touch and feel before buying so i have to order online and am at a loss as to what i would type in to get that!
ReplyDeleteOh noooes! I have no idea. I definitely didn't pay attention when I bought it and I bought it two years ago, so I reeeally am not sure. I guess I would look for materials that have different blends (it's definitely not cotton, that's all I can tell you for sure) and seem to have textured patterns on them. I wish I could be of more help!!!
DeleteCan you by the sensory hoops already made up and buy them off amazon or something??
ReplyDeleteNope, sorry. :/
DeleteHiya, iam just doing some research on making a sensory board for 2 yr olds.is there anyone that could give me some ideas wot i could use plz! Best fabrics, textures ect thank u ��
ReplyDeleteI just shopped by feel. Go through and touch a bunch of different fabrics and try to get some that are rough, smooth, bumpy, scaly, soft, furry, fuzzy, etc. :)
DeleteFind a thrift store and you will pay less than .50 cents for an embroidery hoop ! they are EVERYWHERE! or just ask your granny ;)
ReplyDeleteOoh, great tip!
DeleteAWEsome!! I want to make one of these today and I tried before but was deterred because i couldn't find a board thick enough to secure stuff to. How do you secure the items on the board with screws if the board isn't very thick?
ReplyDeleteI used very short screws for most of the items - the light switches are mounted on light boxes (rather than flat against the board). You can buy different thickness of MDF and I went with one of the thickest, which helped a lot.
DeleteYou are so clever. Do you know about what it cost to make each of these?
ReplyDeleteThank you! :) It depends on what you put on them. For instance the remote doorbell was around $25 alone. I'd say it would run you anywhere from $25 to $60 depending on what items you chose. Hope that helps!!!
DeleteThank you so much this site is really helpful and is coming in handy with my parenting class projects.
ReplyDeleteGlad to hear it! :)
DeleteI am immediately drawn to the board full of latches and locks, and then horrified that it might teach little ones to escape the house and get into major no-nos before they learn safety. Either way it looks like it would be a favorite!
ReplyDeleteWe've never had that problem, but if you were worried about it you could choose other items instead and it would still be a ton of fun! :)
Deletefor the board with the embroidery hoops did you cut the fabric bigger then the hoop and let it go over the edge?
ReplyDeleteI did and then once I tightened the hoops, I used scissors to trim the excess off the back. Hope that helps!
DeleteAwesome idea to stimulate little minds during their exploration of their surroundings. Love it and sharing your post now. :)
ReplyDeleteThank you so much, Tiffany!
DeleteHi, I'm attempting to make these for my playgroup, 2-3 yr olds. What hooks did you use to hang the locks, hanging chains and clasps? Those silver round metal things? Thanks!!
ReplyDeleteYep! I don't know what they're called, but they're basically a screw with a loop at the end. There are probably a few different ways you could hang them. If you bring an example to a local home improvement store they can point you to some choices! :) What a fun playgroup!!!
DeleteI love these ideas. I no longer have a toddler but this would be a great gift to make for a little person turning one. Thanks for sharing. Can't wait to make this. :)
ReplyDeleteWhat a great gift idea! And a lucky little one year old!
DeleteThese sensory boards are wonderful! I love these ideas :)
ReplyDeleteawesome idea. I may use something like this in my infant toddler classroom.
ReplyDeleteOooh! That would be awesome!
ReplyDeleteHello! I'm dying to make the fabric hoops for the daycare I work at, but the question came up about sanitizing-a big deal with infants and toddlers. Do you think these are washing machine compatible? If not, do you have any recommendations for sanitation? I have the book, which I showed to my boss, and she is willing to allow me to make this if I have a good way to sanitize.
ReplyDeleteYou could remove the fabric and wash it as long as the fabric you choose is washing machine safe. I would think wiping them down as you do other surfaces would be fine? That's the route I'd go because it's simplest! Hopefully that works. :) :) :)
DeleteFabulous ideas...
ReplyDeleteHi i was wondering what size the embroidery hoops you used are? :)
ReplyDelete4 inches (10.16cm). Hope that helps! :)
DeleteThank you! I was also wondering how did you attach the embroidery hoops onto the MDF board?
DeleteI used hooks, but you could also use velcro.
Delete