Fun at Home with Kids

DIY Kids Buzz Lightyear No Sew Halloween Costume

Thursday, September 26, 2013

The first movie S ever watched was Toy Story, so when I asked her what costume she wanted for Halloween last year, it wasn't SO surprising that she wanted to be Buzz Lightyear.  As I mentioned yesterday when I shared X's baby chicken Halloween Costume - I love making DIY Halloween costumes because they can be quick and easy and they save you SO much money!

This post contains affiliate links for your convenience.

Though I usually use felt to make my no-sew creations, I really wanted wings that stood out by themselves for S's Buzz Lightyear costume - so I used foam sheets in Buzz Lightyear colors - white, lime green, red, black, and purple.  You can buy foam sheets online or find them in a craft store like Michaels.  First I set to work making Buzz Lightyear's wings and space pack by looking at a MULTITUDE of Buzz Lightyear pictures online.  I used S's arm span as a guide for the length of the wings, and I used the white turtleneck shirt she was going to wear as a guide for the size of the jet pack.  I used a hot glue gun to attach all the pieces.


Here's a closer look at the jetpack.  I used hot glue over foam pieces to make the exhaust fan.


Because S would be riding in a carseat, and also because she was 3 and 3 year olds have a habit of not wearing their costumes the entire time - I made the wings detachable.  I affixed self adhesive velcro to the wings and the corresponding spots on her t-shirt (roughly around where her shoulder blades are).  Here the wings and velcro look a little bent - that's because these were smooshed up in a storage container in our garage for a year between last Halloween and now - ha!


Next, to make the chestplate, I did some more cutting of foam pieces to make the buttons and such.  I again used her shirt as a guide for the size of the chestplate.  I used some backer rod foam to trim the arms of the chestplate.  Because the chestplate could interfere with strapping her into her carseat, I made this piece removable as well - again using self adhesive velcro.


For the armcuffs, I decided to glue the pieces of foam directly to the shirt.


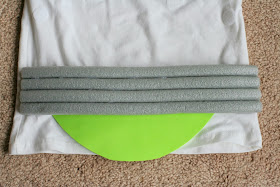
I made her a space belt by gluing four strips of backer rod foam together and adding a piece of green foam at the bottom.


I didn't want to permanently change her rainboots with paint, so I instead cut chunks of playfoam and taped them down with packing tape.  Once Halloween had passed, we just peeled the tape off and all the foam came off and the boots were as good as new.  Note: please be careful not to wrap packing tape over the bottoms of your child's boots as this would cover the tread on the boots and create a slipping hazard.


And how did she feel about her completed costume?  It was a total hit. :)


Follow along with Fun at Home with Kids on FacebookGoogle+Pinterest or Subscribe by Email or Bloglovin'!

All activities here are activities I feel are safe for my own children.  As your child's parents/guardians, you will need to decide what you feel is safe for your family.  I always encourage contacting your child's pediatrician for guidance if you are not sure about the safety/age appropriateness of an activity. All activities on this blog are intended to be performed with adult supervision.  Appropriate and reasonable caution should be used when activities call for the use of materials that could potentially be harmful, such as scissors, or items that could present a choking risk (small items), or a drowning risk (water activities), and with introducing a new food/ingredient to a child (allergies).  Observe caution and safety at all times.  The author and blog disclaim liability for any damage, mishap, or injury that may occur from engaging in any of these activities on this blog.

DIY No Sew Baby Chicken Halloween Costume

Wednesday, September 25, 2013

I love making Halloween costumes.  Really.  It's not often that you only wear something once a year - so they don't have to be durably constructed - ha!  So I make our kids' Halloween costumes the easy way - the no-sew way!

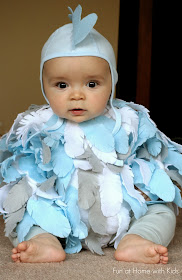
DIY No-Sew Baby Chicken Halloween Costume.  Took under 2 hours and cost under 2 dollars to make!  From Fun at Home with Kids

We decided that little baby X wanted to be a baby chicken for Halloween last year.  I was too cheap to buy yellow pants and a white pilot cap, but I did have a pair of gray leggings already, and a blue pilot's cap that he'd nearly grown out of.  Bingo!

First thing's first - once you've decided on your baby chicken's color scheme (traditional or, ahem, non-traditional), it's time to get felt sheets in those colors.  I went with mainly white feathers, with a few light blue and gray felt highlights thrown in the mix.  I cut a feather-like shape out of felt and used it as a template to make the rest.  Once we had toooons of feathers, we used scissors to make the feathered edges.  I say we because this project is actually easy enough that a 3 year old with some scissor skills can help with - S made several of the feathers on this costume!

This post contains affiliate links for your convenience.

Next you want to take a long sleeved white onesie (bonus - you can't tell if it's stained - so we used an old stained one of S's!) and start laying your feathers at the bottom and work your way up.  You can go in straight rows or wavy lines - I kind of alternated as I worked my way up.  I did one single dot of glue  per feather from my trusty hot glue gun at the base of the feather to give it a bit of mobility.


Once I had the front completely feathered, I flipped it over and cut some basic white wings (you can see one below the gray and blue feathers here) and attached them with a line of hot glue.  I finished the wings by placing a few additional feathers over the top.


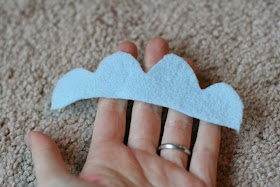
To make the cap, you'll need a fitted baby hat or pilot cap.  Lay it down and cut a chicken comb based on the length and curvature of the hat.  I put a line of glue down the center of the pilot cap and held the felt comb so that it was perpendicular to the hat.  I needed to hold it until the glue set to ensure that it would stand straight up.


To complete the costume, we dressed little X in a snug short sleeved white onesie, then put the chicken onesie over the top.  Between the two onesies we stuffed a few handfuls of polyester stuffing to give him a good fat chicken belly.  We put his gray leggings on underneath the chicken onesie to give them more of a chicken leg look.  :)


The whole costume took under 2 hours to make and since we used clothes we had on hand, it cost under $2 to make!  Total Halloween costume win.

Follow along with Fun at Home with Kids on FacebookGoogle+Pinterest or Subscribe by Email or Bloglovin'!

All activities here are activities I feel are safe for my own children.  As your child's parents/guardians, you will need to decide what you feel is safe for your family.  I always encourage contacting your child's pediatrician for guidance if you are not sure about the safety/age appropriateness of an activity. All activities on this blog are intended to be performed with adult supervision.  Appropriate and reasonable caution should be used when activities call for the use of materials that could potentially be harmful, such as scissors, or items that could present a choking risk (small items), or a drowning risk (water activities), and with introducing a new food/ingredient to a child (allergies).  Observe caution and safety at all times.  The author and blog disclaim liability for any damage, mishap, or injury that may occur from engaging in any of these activities on this blog.

The Ultimate List of Baby Play Ideas

Monday, September 23, 2013


I thought it would be great to compile a ton of the fabulous baby play ideas I've seen in one spot - as well as hopefully introduce you to some great baby (and toddler and preschooler) play bloggers!  For each site you'll see one representative photo, links to that blogger's top five favorite baby play activities, and you'll also find a link to their complete baby play archive.  We've got all the bases covered - lots of great DIY sensory ideas, baby safe sensory bins, even baby friendly paint recipes!  There are so many clever and creative ways to play with babies here - I have so enjoyed seeing the inquisitive and curious looks on all their tiny faces as I compiled this list!


Fun at Home with Kids' five favorite baby play posts are:

You can find ALL of Fun at Home with Kids' baby play posts here.


The Imagination Tree's five favorite baby play posts are:

You can find ALL of The Imagination Tree's baby play posts here.


Learn Play Imagine's five favorite baby play posts are:

You can find ALL of Learn Play Imagine's baby play posts here.


House of Burke's five favorite baby play posts are:

You can find ALL of House of Burke's baby play posts here.


Dirt and Boogers' five favorite baby play posts are:
Baby Water Play (pictured)

You can find ALL of Dirt and Boogers' baby play posts here.


Learn with Play at Home's five favorite baby play posts are:
Baby Box Play (pictured)

You can find ALL of Learn with Play at Home's baby play posts here.


Toddler Approved's five favorite baby play posts are:

You can find ALL of Toddler Approved's baby play posts here.

Paint on the Ceiling

Paint on the Ceiling's five favorite baby play posts are:
Hanging Objects
Textile Treasure Basket
Sensory Water Bag
Fun with Sheets
Rice Bubble Sensory Tub

You can find ALL of Paint on the Ceiling's baby play posts here.


Plain Vanilla Mom's five favorite baby posts are:
Travel Boxes
Pom Pom Sensory Bin
Alphabet Soup: First Sensory Bins
Sensory Bag for Baby

You can find ALL of Plain Vanilla Mom's baby play posts here.


Laughing Kids Learn's five favorite baby play posts are:

You can find ALL of Laughing Kids Learn's baby play posts here.


Childhood 101's five favorite baby play posts are:

You can find ALL of Childhood 101's baby play posts here.


Nurturestore's five favorite baby play posts are:

You can find ALL of Nurturestore's baby play posts here.


Lesson Learnt Journal's five favorite baby play posts are:

You can find ALL of Lesson Learnt Journal's baby play posts here.


Follow along with Fun at Home with Kids on FacebookGoogle+Pinterest or Subscribe by Email or Bloglovin'!

All activities here are activities I feel are safe for my own children.  As your child's parents/guardians, you will need to decide what you feel is safe for your family.  I always encourage contacting your child's pediatrician for guidance if you are not sure about the safety/age appropriateness of an activity. All activities on this blog are intended to be performed with adult supervision.  Appropriate and reasonable caution should be used when activities call for the use of materials that could potentially be harmful, such as scissors, or items that could present a choking risk (small items), or a drowning risk (water activities), and with introducing a new food/ingredient to a child (allergies).  Observe caution and safety at all times.  The author and blog disclaim liability for any damage, mishap, or injury that may occur from engaging in any of these activities on this blog.

Scented Baked Cotton Balls

Thursday, September 19, 2013

If you've been following along with us lately, you may have noticed we have been having a lot of fun with activities that also happen to make our house smell delicious.  I love the scents of Fall, so this has been especially fun for me.  We've made Pumpkin Spice Salt Dough Ornaments, our favorite Low Sugar Whole Wheat Pumpkin Muffins, Scented Microwave Puffy Paint...and next on our list of delicious smelling activities is Scented Baked Cotton Balls!


We love Baked Cotton Balls.  Admittedly I thought the activity was a bit bizarre when I first heard of it - but once we tried it we were immediate fans.  There really is something so fun about deconstructing the art you've made - and who can resist the smooth goopy art-making process?


S and I settled on making a Jack O Lantern that was orange with a green stem and black face.  She helped me whisk the batter and then she was on her own to create whatever Jack O Lantern she wished.


She had a definite plan and created an adorable (somewhat round) pumpkin.  At first she was going to make him "scary", but at the last minute she decided to switch to "friendly".


While he baked away in the oven, our house filled with the delicious smell of pumpkin pie!  He smelled so good when he came out, S spent several minutes sniffing him all over.


The sniffing soon led to some silliness.  Hahaha!


And then it was time to break him apart.  Depending on how much batter you use, these can be pretty hard to break apart.  S really enjoyed the challenge, but a younger child might need your help.  It's so crazy to me every time that the cotton ball is preserved and perfectly dry, white, and fluffy inside.  Soooo fun!


Even X, who has been VERY focused on learning to walk lately, took a break to check out the fun and admire his sister's strength.  :)

This post contains affiliate links for your convenience.

To make your own scented baked cotton balls, you'll need:

Flour
Water
Food Coloring or Liquid Watercolors
Cotton Balls
Pumpkin Pie Spice and/or Cinnamon

You want to mix the flour and water in a roughly 1:1 ratio.  For this project because I wanted to make a shape that stuck together well, I added slightly less water to make a thicker batter (I probably added around 3/4 cup water to every 1 cup of flour).  You'll want to whisk all the lumps out.  You can add food coloring (if you want it to be edible) or liquid watercolors (we used liquid watercolors here) and spices.  We made our orange batter pumpkin pie scented by adding about a teaspoon of Pumpkin Pie Spice.  We made the green and black batter cinnamon scented by adding a dash of cinnamon to each.  Add your creation to a foil covered baking sheet and once it's complete, put it in a 300 degree oven for 90 minutes (if it's a smaller design, less time will be needed).  Once you remove it from the oven it will be HOT.  An adult needs to check the temperature of the baked cotton balls carefully before handing it over to a child.  I recommend letting it cool for at least 15 minutes before little hands play with it.

And what do you do if you have leftover batter?  You can modify it slightly to make Scented Microwave Puffy Paint!

I noticed that Play at Home with Mom had a similar idea the other day - you can see their fall tree here!

Follow along with Fun at Home with Kids on FacebookGoogle+Pinterest or Subscribe by Email or Bloglovin'!

All activities here are activities I feel are safe for my own children.  As your child's parents/guardians, you will need to decide what you feel is safe for your family.  I always encourage contacting your child's pediatrician for guidance if you are not sure about the safety/age appropriateness of an activity. All activities on this blog are intended to be performed with adult supervision.  Appropriate and reasonable caution should be used when activities call for the use of materials that could potentially be harmful, such as scissors, or items that could present a choking risk (small items), or a drowning risk (water activities), and with introducing a new food/ingredient to a child (allergies).  Observe caution and safety at all times.  The author and blog disclaim liability for any damage, mishap, or injury that may occur from engaging in any of these activities on this blog.

Fall Scented Microwave Puffy Paint Recipe

Wednesday, September 18, 2013

As I mentioned in our post yesterday on The Best Microwave Puffy Paint Recipe, my child is a wee bit addicted to microwave puffy paints.  So, of course, in honor of fall, we needed to make a batch of fall scented microwave puffy paints!


S was so excited by all the smells that she decided to make some gardens with pumpkins and apples (and lettuce - ha!).


The paint was super fragrant as she worked - we both enjoyed that part.


And then when we microwaved to puff the paint - oh my word!  Our house smelled even more amazing.


I just love all of her intricate designs.  She's putting the face on a garden bug and she's made lollipop lettuce, a tomato plant, and a very large strawberry as well.  So cute.

This post contains affiliate links for your convenience.

To make our Fall Scented Puffy Paints, we took our Puffy Paint recipe and added red liquid watercolors and some Apple Cider Drink Mix to make Red Apple Cider Paint; we added orange liquid watercolors and Pumpkin Pie Spice to make Orange Pumpkin Pie Paint; we added green liquid watercolors and cinnamon to make Green Cinnamon Paint.  Yummmm!


Looking for even more fun to have with your Fall Microwave Puffy Paint?  Check out this beautiful tree art from Blog Me Mom!  And check out this awesome recipe for Homemade Candy Apple Puffy Paint from Learn Play Imagine!

Follow along with Fun at Home with Kids on FacebookGoogle+Pinterest or Subscribe by Email or Bloglovin'!

All activities here are activities I feel are safe for my own children.  As your child's parents/guardians, you will need to decide what you feel is safe for your family.  I always encourage contacting your child's pediatrician for guidance if you are not sure about the safety/age appropriateness of an activity. All activities on this blog are intended to be performed with adult supervision.  Appropriate and reasonable caution should be used when activities call for the use of materials that could potentially be harmful, such as scissors, or items that could present a choking risk (small items), or a drowning risk (water activities), and with introducing a new food/ingredient to a child (allergies).  Observe caution and safety at all times.  The author and blog disclaim liability for any damage, mishap, or injury that may occur from engaging in any of these activities on this blog.

Which Microwave Puffy Paint Recipe is best?

Tuesday, September 17, 2013

Before I started blogging, one of our staple activities was Microwave Puffy Paint.  I cannot even tell you how many times I've made it.  There was even a period of time where S literally requested it daily!


Fast forward a few months, and now that I'm blogging, I read a ton of other blogs.  And I started noticing how much variation there was between microwave puffy paint recipes.  The recipe we've always used calls for baking powder, which can be a bit costly.  So I thought I'd set up a little experiment with S and see if we could tell which recipe was the best for making Microwave Puffy Paints!

I created four different mixtures.  The base of all of them was identical:  all-purpose flour with a dash of salt mixed with water.  I left one just as it was (green), added a teaspoon of baking powder to the light blue, two teaspoons of baking powder to the dark blue, and three teaspoons of baking powder to the purple.  I also added color to each so we could easily tell them apart.  (I used liquid watercolors, but you could also use food coloring.)


Then I had my fellow scientist make a straight line of each.


They were so pretty I had to take a picture, hahaha.


And here were our initial results (after 30 seconds in the microwave).  Because S is still small, she had a hard time making the amount of pressure in her squeeze constant, so the dark blue and purple lines were a bit wider than the other two.


  Just for ease of comparison, I created a set of more uniform lines.


For reference, purple has three teaspoons of baking powder, green has none, dark blue has 2 teaspoons, and light blue has 1 teaspoon.  After observing the visual differences, we had S do a squish test.

This post contains affiliate links for your convenience.

Here's what we learned.  Yes, baking powder does make it puffier - but the amount by which it does is fairly negligible.  S was not able to tell a difference between any of them by sight, and said that possibly the purple felt a bit puffier - but even with that - she wasn't completely sure.  I also had my mom and my husband look and and touch each of the finished products.  At first they could not tell a difference either, but upon closer inspection they did note that the dark blue and purple were a bit puffier.  Our conclusion?  Add baking powder if you want to - but we felt like for the cost, it's not worth it.  You still will get quite a bit of puff without it.

So here's our new recipe for Microwave Puffy Paint:

All Purpose Flour
A dash of salt (around a teaspoon)
Water
Baking Powder (optional!)
Liquid Watercolors or Food Coloring (optional)

When making a batch, you want to make sure you have a whisk on hand for the best results.  Slowly add water to your flour and salt mixture (I find that 1 cup of flour to around 1 cup water makes enough puffy paint for one child in one sitting).  Aim for a thick batter - like you would for muffins or pancakes.  It should pour, but not be runny.  There is a fair amount of forgiveness in this recipe - if it's too watery it will still work, it will just be less puffy.  The thicker you make it, the more definition the lines you squeeze will have.  Here's the most important part - whisk or mix until your mixture is FREE OF LUMPS.  Flour lumps will clog your squeeze bottles and frustrate your kiddo (I made the mistake of not whisking the first time I made this and S had such a hard time - boo!).  If you don't have a whisk, I'd recommend using a fork and allowing the mixture to sit for a few minutes between stirring.  I think this paint is most fun with squeeze bottles (if you don't have those, you could always try putting the paint in a ziploc bag with a small corner snipped off), but you can also use it as finger paint, or paint with brushes.

Once you are finished creating your masterpiece, just pop it in the microwave for around 30 seconds.  Small amounts of paint will need less time to cook (usually around 15 seconds) and large quantities of paint may need a minute or more in the microwave.  Once it's done cooking the steam and paint are HOT.  Please have an adult use care to move them (having them cool for five minutes in the microwave is a great course of action) and please have the adult check the temperature to make sure there are no hot spots before handing the finished product to a child.  Also, as the paint dries, it will pull up the edges of your paper.  We have found the most success with using cardstock paper or the thin cardboard from cereal (and other) boxes as we did here.  :)

Check back tomorrow for another fun way to use Microwave Puffy Paint!

Follow along with Fun at Home with Kids on FacebookGoogle+Pinterest or Subscribe by Email or Bloglovin'!

All activities here are activities I feel are safe for my own children.  As your child's parents/guardians, you will need to decide what you feel is safe for your family.  I always encourage contacting your child's pediatrician for guidance if you are not sure about the safety/age appropriateness of an activity. All activities on this blog are intended to be performed with adult supervision.  Appropriate and reasonable caution should be used when activities call for the use of materials that could potentially be harmful, such as scissors, or items that could present a choking risk (small items), or a drowning risk (water activities), and with introducing a new food/ingredient to a child (allergies).  Observe caution and safety at all times.  The author and blog disclaim liability for any damage, mishap, or injury that may occur from engaging in any of these activities on this blog.