
Oh goodness, this took forever to perfect. I have made so many versions of giant volcanoes over the last few weeks, but I can tell you THIS, this is THE volcano, folks.
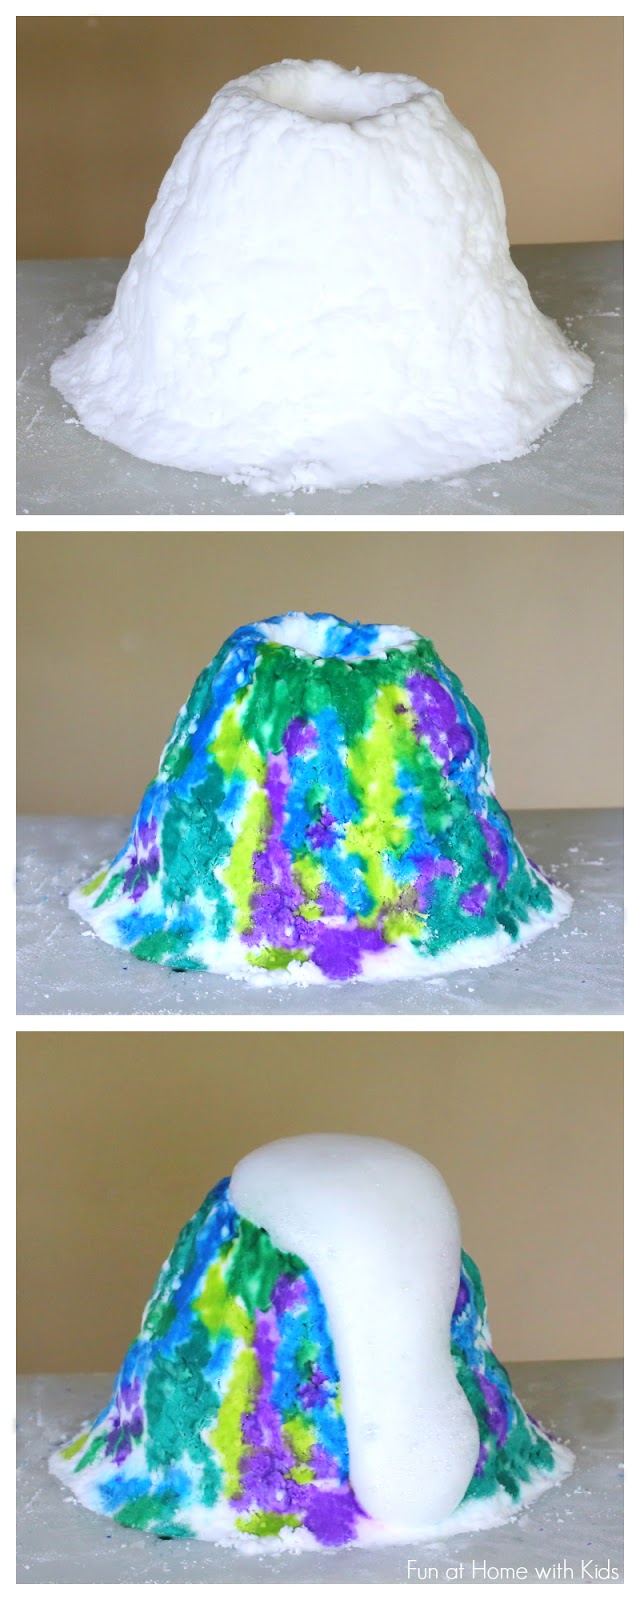
First you build it. I built this one, but a kid could totally build it if you weren't super picky on how straight it was, etc. Once it's built, let it dry overnight (you can let it dry for several days if you'd rather).

Next you paint it! We used eyedroppers full of liquid watercolors (of course), but you could use diluted food coloring if you'd like. We are on a painting jag after our Salt Sculptures. The volcano will take color well, but you want to paint it right before you erupt it. Unlike our Salt Sculptures, the volcano will flake off the color if you allow it to dry for several hours, so it's not meant to be a long-lasting sculpture.

I got to help a little - it's a lot of fun to paint.

Once it's painted - add some dish soap to the middle, add some vinegar and watch 'er blowwww!!!!

It's a good idea to put it in a container. :)

Isn't it pretty?

It lasts for several eruptions. Doesn't it look kind of cool in between? It holds its structure quite well.

This post contains affiliate links for your convenience.
To make your own, you'll need:
Baking Soda
Water
Vinegar
Dish Soap (aka Washing up Liquid)
Liquid Watercolors (or Diluted Food Coloring)
To make the "dough" for the volcano, mix (every) 1 cup of baking soda with 3 Tablespoons of water. I think I used 6 cups of baking soda here, but you can certainly make smaller (or larger!) volcanoes. Make sure that you have thoroughly mixed the water and the baking soda. A good test is making a fist around some of the wet baking soda - if it holds, you've added enough water. If you need to add a little extra water to make it easier to mold, that's fine, just allow some extra time to dry.
As I explained above, plan to paint and erupt the volcano at the same time. Just before you are ready to erupt the volcano with vinegar, add about 1 teaspoon of dish soap (it's not necessary to measure - just to give you an idea of how much). Then add vinegar to your heart's content! We like adding vinegar with squeezy bottles.
Follow along with Fun at Home with Kids on Facebook, Google+, Pinterest or Subscribe by Email or Bloglovin'!
All activities here are activities I feel are safe for my own children. As your child's parents/guardians, you will need to decide what you feel is safe for your family. I always encourage contacting your child's pediatrician for guidance if you are not sure about the safety/age appropriateness of an activity. All activities on this blog are intended to be performed with adult supervision. Appropriate and reasonable caution should be used when activities call for the use of materials that could potentially be harmful, such as scissors, or items that could present a choking risk (small items), or a drowning risk (water activities), and with introducing a new food/ingredient to a child (allergies). Observe caution and safety at all times. The author and blog disclaim liability for any damage, mishap, or injury that may occur from engaging in any of these activities on this blog.


I love this eruption! Makes me want to try it also :-)
ReplyDeleteThank you, Angela! I had a ton of fun with it, too! Hehehe.
DeleteVolcanoes are always fun, but this one is pretty too!
ReplyDeleteThank you, Emma! :)
DeleteI love your ideas! They are so cool :) But you hear it all the time, right? ;) The volcano is fantastic!!
ReplyDeleteHah! You are too kind, Anik! Thank you!!!! :)
DeleteLOVE this -- and if you leave out the food colouring, you can use the leftover mix to wash the floors ;)
ReplyDelete(But that wouldn't be nearly as fun.)
Hahaha - that's true! Thank you, Jennifer! :)
DeleteCan you bake it to dry it quicker?
ReplyDeleteGood question! I suspect that would cause it to flake off, but I'm not positive since I haven't tried it. If you do try it and it works, let me know and I'll add it to the post!
DeleteHELP!! Mine will not form. First too crumbly now it won't build up, it just flattens out. I was able to get a short mound, but when I tried digging out the middle to create a hole to pour in vinegar, it collapsed.
ReplyDeleteOh noooo!!! Well part of the problem might be the digging out - I formed a well as I built it up (it doesn't go all the way down). It may be easier to sculpt if you add some more water, too. Try adding a teaspoon or two more water and mixing well and see if it makes it easier to work with. Hope that helps!!!
DeleteI posted a comment before this one, but I think I hit the wrong button and I'm not sure it went through. If it did then I apologize for the double post. I've noticed that bin in several of your sensory play posts and was wondering where you purchased it. I've been looking for one for a while now, but can't find one that size.
ReplyDeleteIt didn't go through, so I'm glad you left it again! This is an underbed storage container. We have two sizes on the blog and this is the shorter one. Not sure if you live in the US, but if you do, we got this one at Target! :)
Delete