
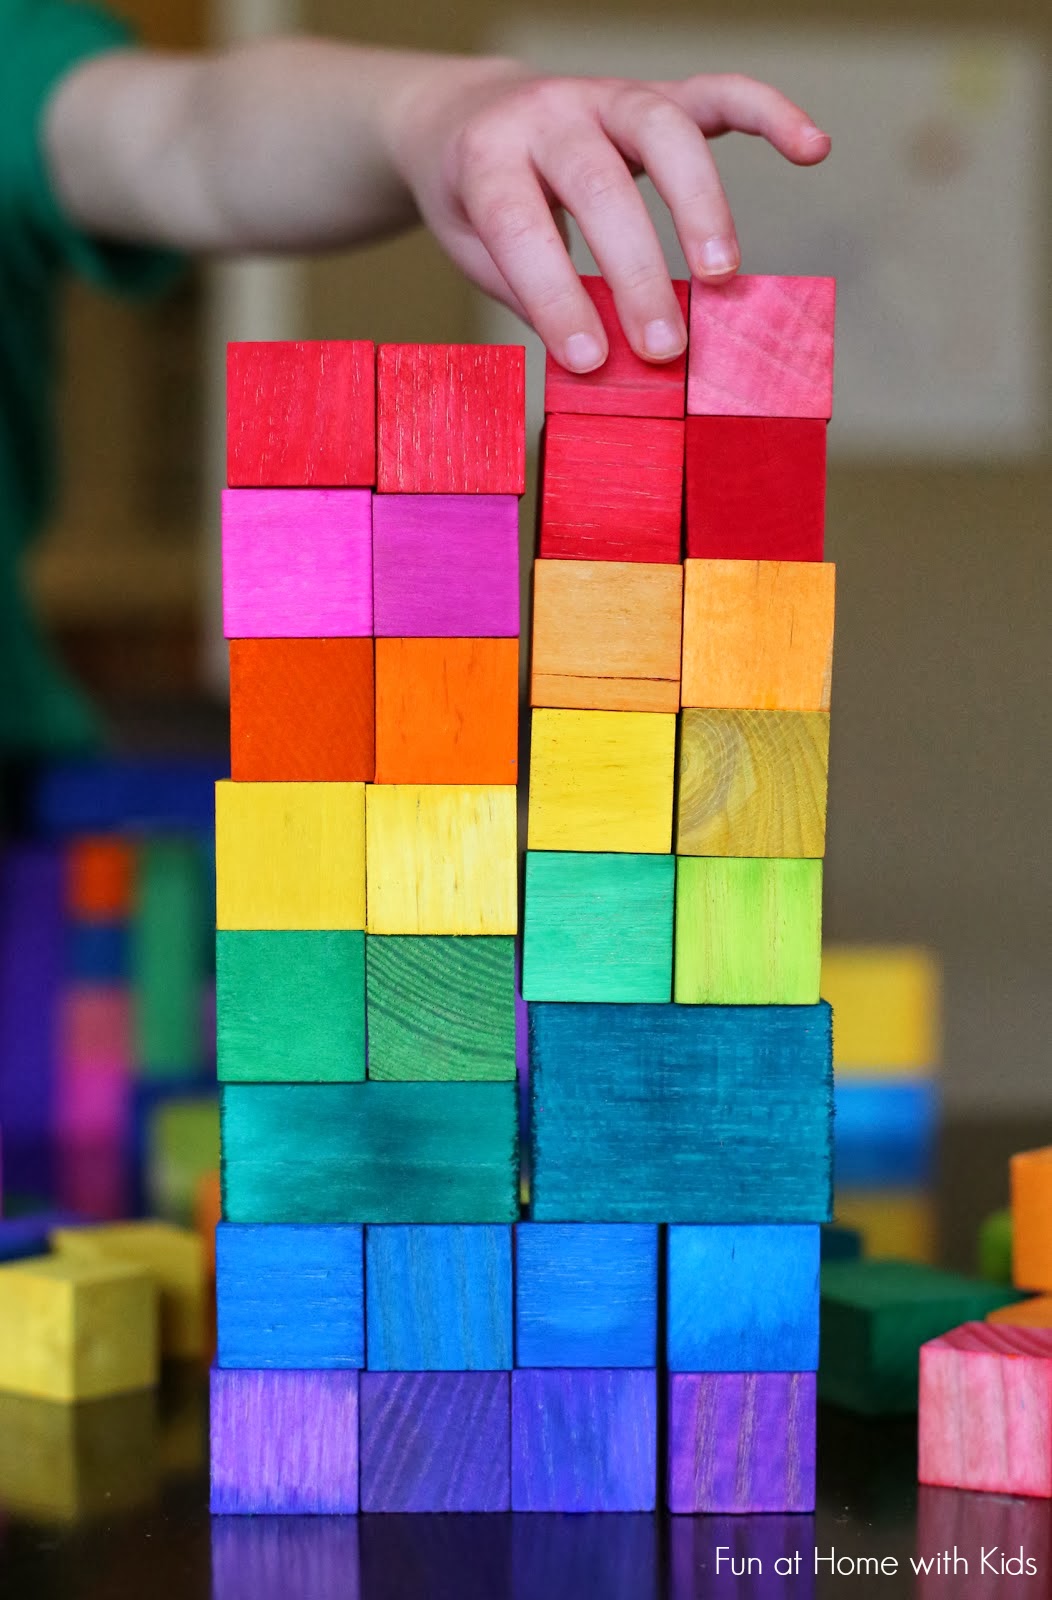
Though we don't follow any specific educational philosophy over here, I do love the simplicity and beauty of Waldorf toys - specifically the Grimm Rainbow Blocks . They are just sooooo beautiful. I have coveted them for a long time now, and though I am sure they are incredibly high quality wooden blocks, I just can't bring myself to spend that much money. So I decided to see if I could come up with a DIY version of the rainbow wooden blocks. I am so thrilled with how well they turned out - and our homemade version was just a fraction of the cost - even better. Though I'm sure ours are not quite heirloom quality, they are super vibrant, bright, and fun to build with - so we're very pleased with them. They would make a fabulous homemade gift as well!
+(1).jpg)
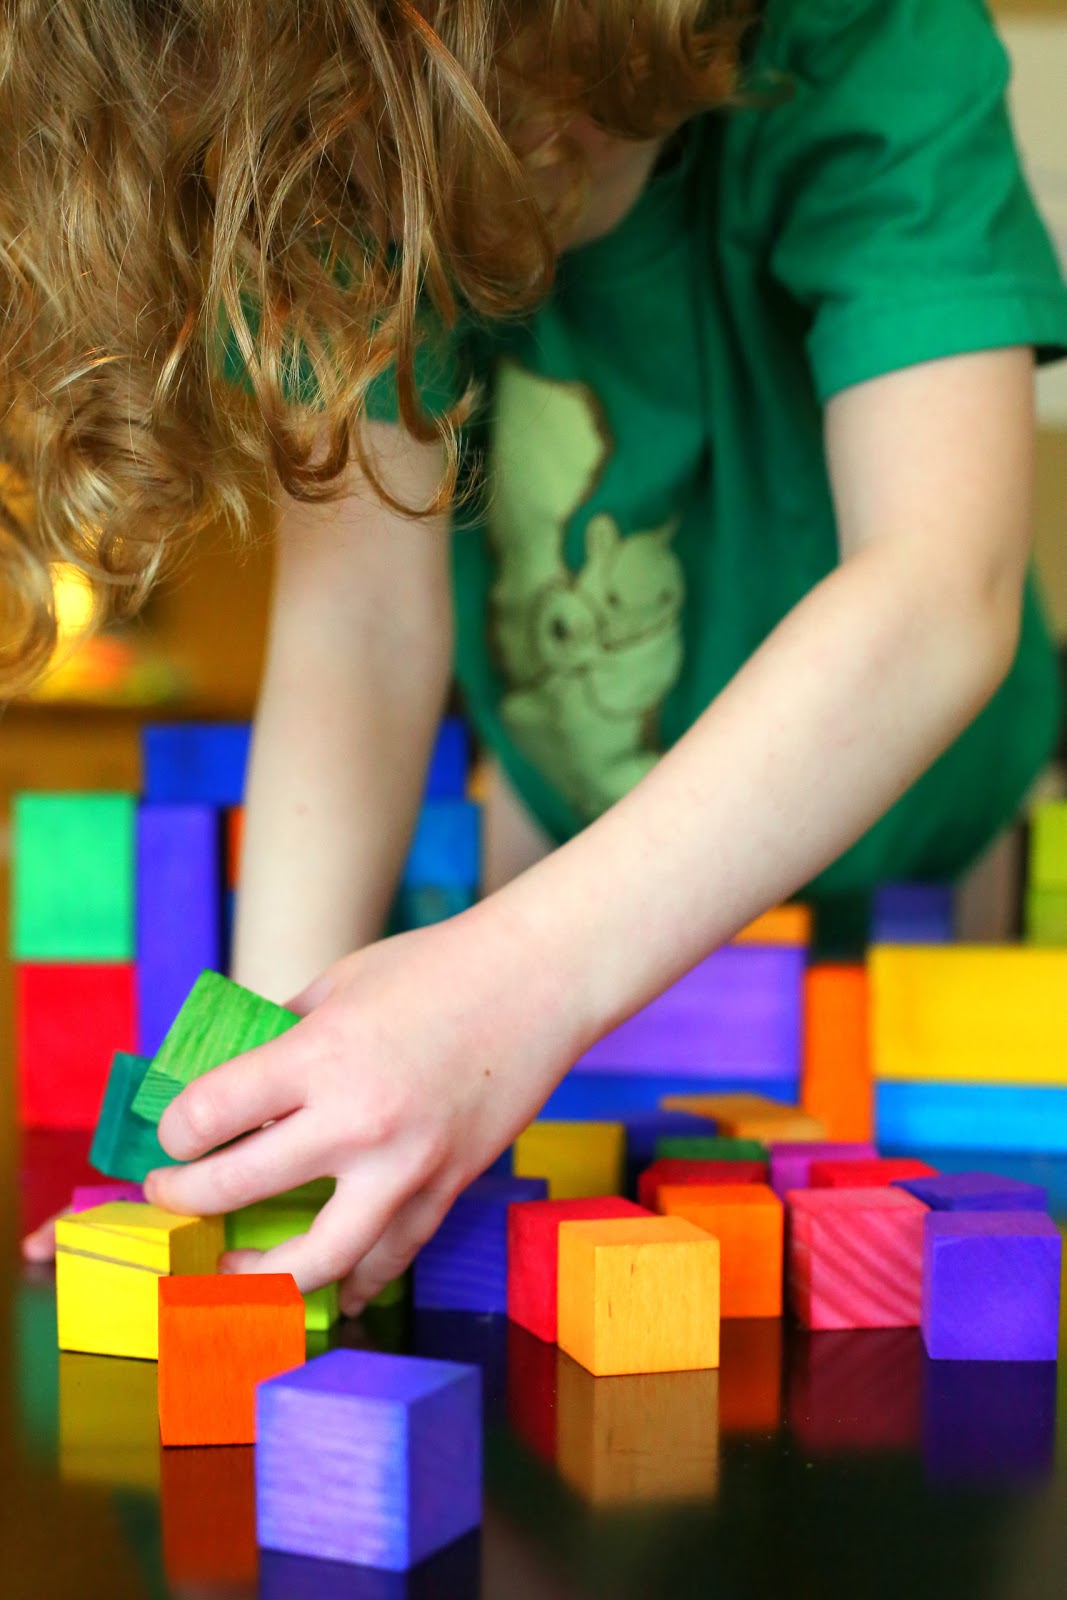
S helped me make them (though the process is a little boring - so she only made about 20% of them before opting to color instead).
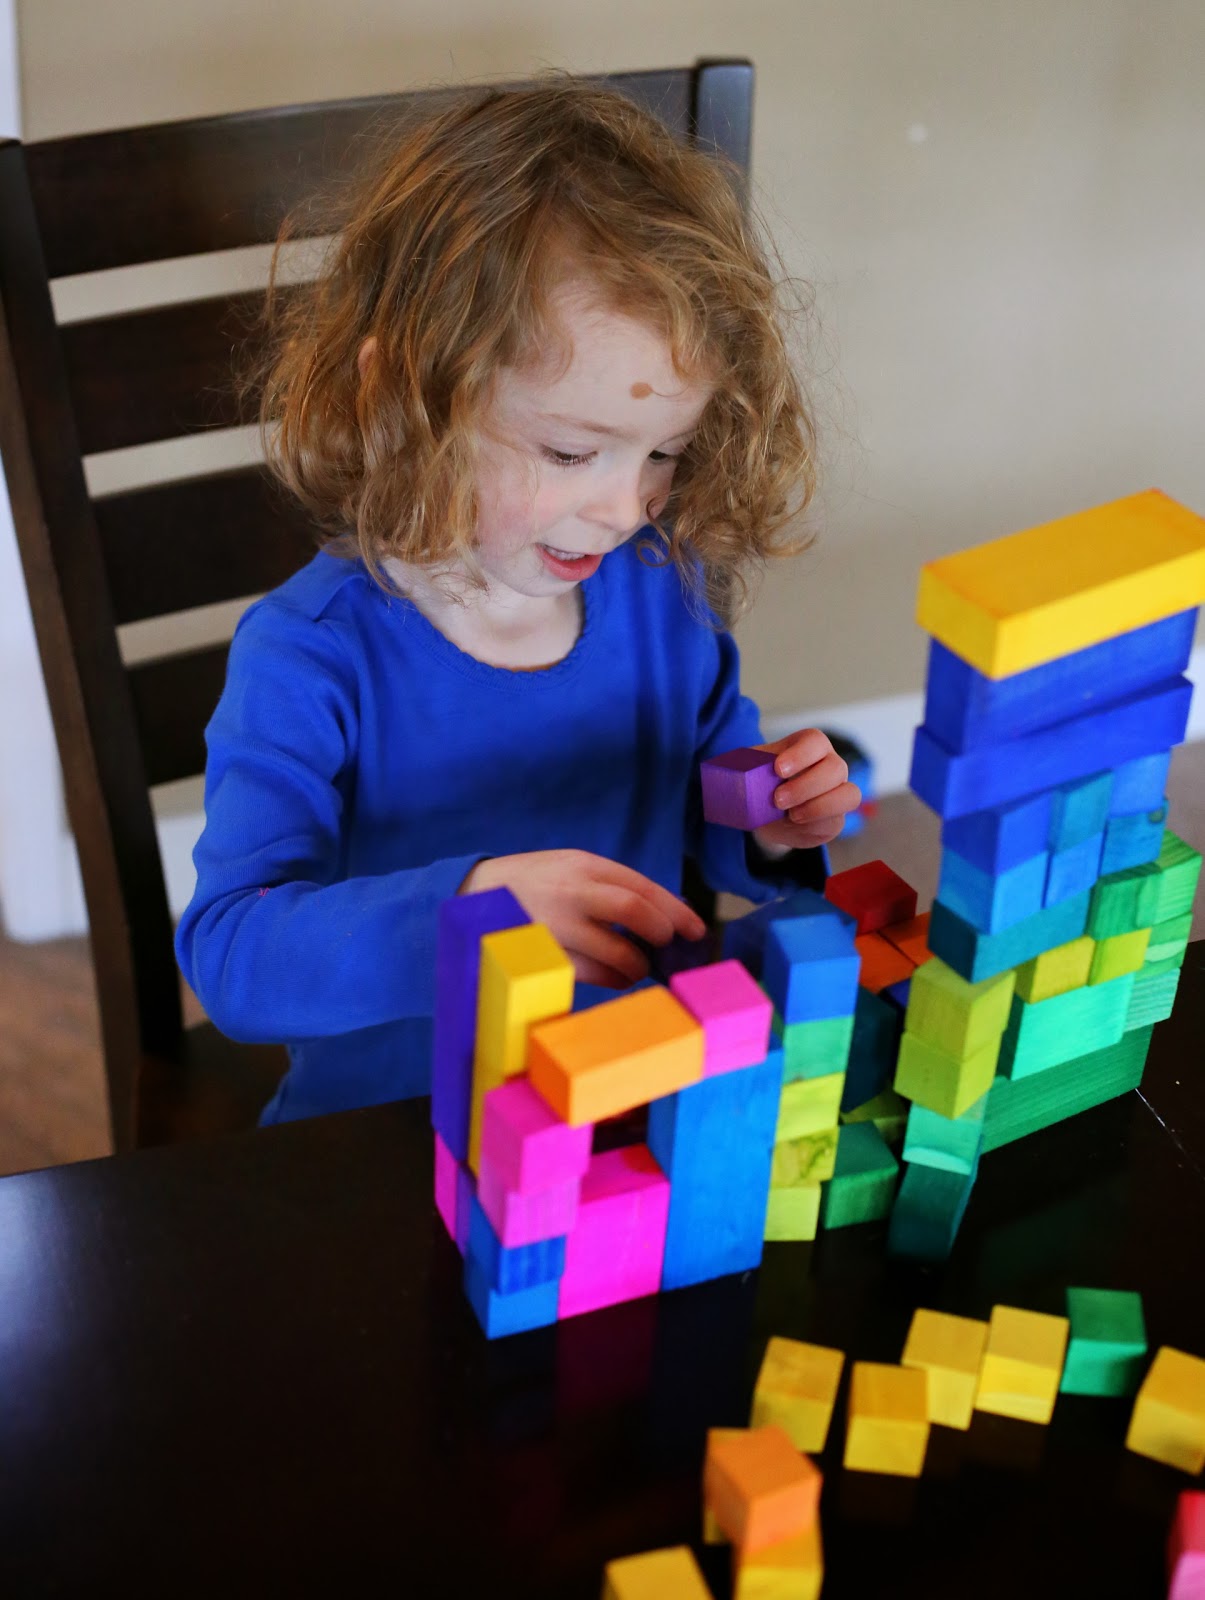
And they are so fun to build with. I can't get over the gorgeous rainbow colors!
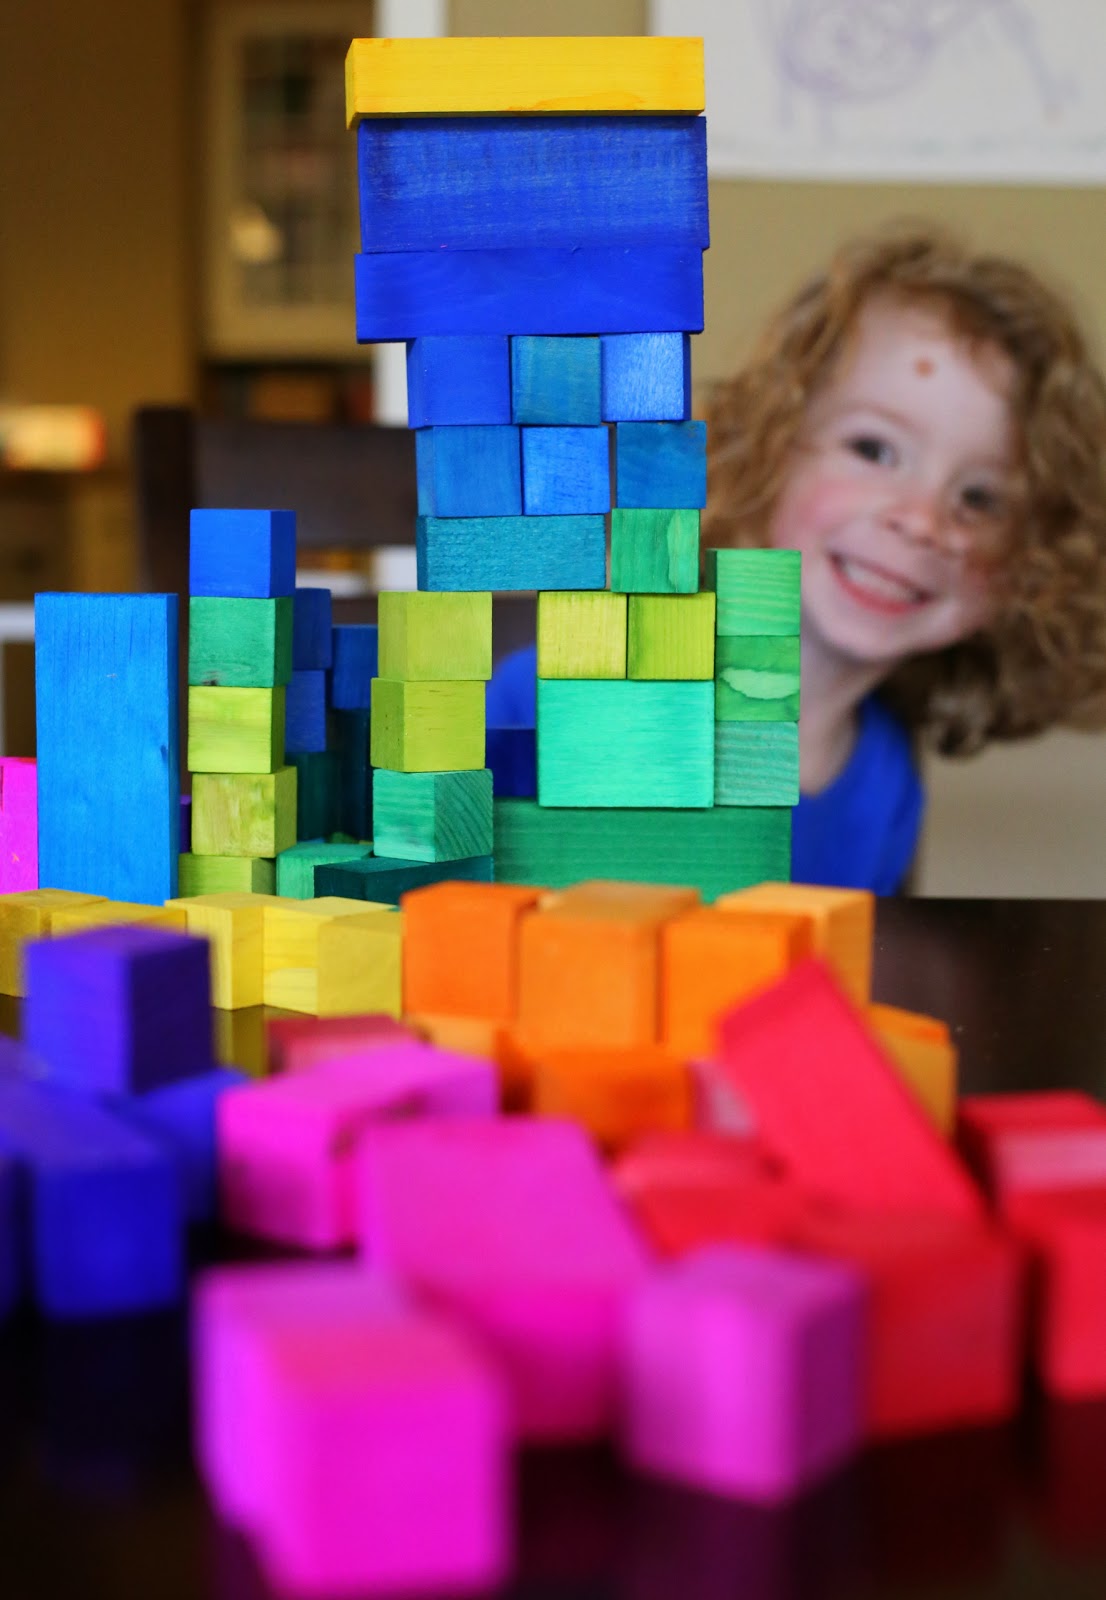
I got to build a little, too.

S and I had fun sorting them into piles by color and then sorting them by hue as well.
To make them is super easy! I first realized you could use liquid watercolors to color wood when I saw Teaching 2 and 3 Year Old's Rainbow Craft Stick Mobiles. I figured if they could make gorgeous craft sticks, they could probably dye wooden blocks. And they totally can! I bought several bags of various sized Unfinished Wood Blocks
at our local craft store (Michaels) using coupons and put a small amount of each different color of liquid watercolors in a tray. We dipped each side of the block in the liquid watercolors for 2 seconds, then flipped, and when the entire block was coated, we laid them on some wax paper to dry.

To be on the safe side, we let our blocks dry for a full 24 hours before using them for building. We used a combination of different brands of liquid watercolors, as well as diluted a few colors to get a wide variety of hues of each color. If you do not have liquid watercolors, I suspect some well mixed dilute food coloring would also work (though you may want to wear gloves while dying them). And just a reminder that the dye is not set - so these are not blocks that should be around babies/toddlers who are still mouthing (as the dye may come off in their mouths).
Follow along with Fun at Home with Kids on Facebook, Google+, Pinterest or Subscribe by Email or Bloglovin'!
All activities here are activities I feel are safe for my own children. As your child's parents/guardians, you will need to decide what you feel is safe for your family. I always encourage contacting your child's pediatrician for guidance if you are not sure about the safety/age appropriateness of an activity. All activities on this blog are intended to be performed with adult supervision. Appropriate and reasonable caution should be used when activities call for the use of materials that could potentially be harmful, such as scissors, or items that could present a choking risk (small items), or a drowning risk (water activities), and with introducing a new food/ingredient to a child (allergies). Observe caution and safety at all times. The author and blog disclaim liability for any damage, mishap, or injury that may occur from engaging in any of these activities on this blog.


These are absolutely beautiful!!! I can't wait to give this a try!
ReplyDeleteThese came out beautifully! I've been dying wood toys with the liquid water colors for awhile now and loving the results. We've done lots of peg people too. I was thinking of making a set of blocks for the boys for Christmas. You've convinced me :) Just beautiful.
ReplyDeleteSo awesome! I love that it's the most washable dye ever - in terms of your hands when you are finished. Yes - make a set of blocks! They are SO fun!!!
DeleteI love them! They are so gorgeous. You've got me thinking now... :) Love them.
ReplyDeleteThank you, Kate! I can't wait to see what you come up with!!!
DeleteWow!! These are fantastic and would make a seriously awesome gift! Great job Asia! :)
ReplyDeleteThey were supposed to be one of S's gifts...but then she helped me make them, hahahaha! Whoops!
Deleteyou could safely set the dye with a little shellac wash...shellac is natural dissolves in alcohol and is used on childrens furniture and medicine coating and what not...ive made blocks like these and used shellac to set...
DeleteVery cool! Good to know!!!
DeleteBeautiful! :-)
ReplyDeleteThank you, Buba!!!
DeleteThis post came at a perfect time because we were going to make several batches of coloured blocks as gifts for Christmas. These blocks look fantastic!! I can't wait to get started on this project now!
ReplyDeleteAwesome! Blocks (or any building toy) are always such a great gift...and well, you know how we feel about bright colors!!! Fabulous gift idea!
DeleteAlso I suspect you could probably add a coat of mod podge or something similar to help seal in the colours. :)
ReplyDeleteTotally - though I wouldn't want a baby mouthing mod podge either, so I went the lazy unfinished route, hahaha. Neither X nor S mouth anymore, so it was good enough for us! :)
DeleteSay what?!?! These are GORGEOUS! Must get wood blocks asap.
ReplyDeleteLOL Dyan! And yes, do!!!! It's so fun and such a quick and easy project!
DeleteAwesome! I tried something similar with little wooden peg people. I did it more than a year ago and it held up great... Until the baby got one in her mouth! Messy! I haven't tried it yet but I think a very small amount of beeswax based wood conditioner would set the paint a little better.
ReplyDeleteI bet it would hold up better - though I dunno that it would be slobber proof, hahaha. Baby slobber is seriously business! I totally wanted to do peg people, too, but our craft store doesn't carry them!!! Serious failing, right?
DeleteI went nuts on this site and I bet you will too:
Deletehttp://www.craftparts.com
Not sure if I should say you're welcome or sorry :)
Hahhaa - just clicked through. I see what you mean! SO MANY THINGS TO DYEEEEEE! I love it! Thank you, Amber!!!
DeleteWow - this is a seriously good idea!!!! They are so beautiful! Any idea how you could set the paint while also keeping them non-toxic??
ReplyDeleteThanks, Stephanie! I'd guess using the beeswax/mineral oil - though honestly if you're going that route the price + time investment may cancel out the savings - I'm not sure. And I don't know about the type of wood used for these blocks either - it just might not be the best mouthing toy regardless. :( You could dig around a bit on the internet to find out for sure. But I do know the quality of wood between these and our Tegu blocks/HABA toys is totally different. It's not anything I'm concerned about with S or X since they don't mouth things, but it would be something to consider if thinking about this for littler ones who may try teething on the wood, etc.
DeleteMaybe try Salad Bowl Finish? http://www.amazon.com/Behlen-Salad-Bowl-Finish/dp/B00075XMNK I am totally interested in doing this for my 14 month old, but he is puts everything in his mouth so I also need a way to seal the blocks
DeletePossibly? I also worry about the softness of the wood with little teeth and it being chewable... To be extra careful I would check with your pediatrician to see if there are any special considerations. I know a chunk of wood would definitely be chokable - I'm not sure if they use a different (more expensive) type of wood for baby teether toys vs. these blocks.
DeleteThis looks so good! I love the colours! Do you think this would work on photo frames and wooden furniture as well? I'm tempted to try!
ReplyDeleteI don't see why it wouldn't! Those sound like awesome ideas!!!!
DeleteLOVE these blocks! When I was little we used to mix vinegar with our Easter egg dye to make the colors set and not rub off on our hands... I wonder if adding vinegar to the watercolors would help the colors set better?
ReplyDeleteMaybe so, Sarah! Though I suspect that if they aren't sealed, water (or drool, hah!) would cause some distortion/loss of color - though it may be much less with vinegar!!
DeleteGreat minds think alike Asia! We've been playing with wood and liquid watercolors too! Actually YOU are the reason I even bought liquid watercolors in the first place! These are absolutely gorgeous.
ReplyDeleteOh awesome, Ana! I can't wait to see what you are up to!!! And hope you love the liquid watercolors! :) :) :)
DeleteGet out! We have some tiny blocks we have been coloring on with markers and crayons...boring and ugly...but these!!! Be still my crafty heart....I've got left over Easter egg tablets...gonna try em out today!! :)
ReplyDeleteBahahaha! Dorothy you made me crack up this morning! Hooray!!! I hope you have your own set of beautiful rainbow blocks in no time - and sweet for coming up with a use for those leftover tablets!!!
DeleteIf you want to try dying peg people, http://www.etsy.com/shop/gemmielou is a great little shop for them! Much more affordable than standard craft stores. I think they're better quality too. And no, I don't work for them at all! I've ordered and was pleased with what arrived. Asia, if you want to check them out, just let me know.
ReplyDeleteOOOH! You are totally right, Monica! Way cheaper!!! Awesome - thank you for the link!
DeleteLove this DIY! Could you seal them with something to make them safer for little ones? I featured this tutorial on my blog! Feel free to check it out: http://theprettypickle.com/blog/handmade-for-the-holidays
ReplyDeleteThank you, Megan! You could certainly try, though I would still check with a pediatrician first because I'm not sure about the softness/quality of the wood - it may be treated with something? I have no idea - I would just be super careful if a little one was going to be chewing on it. Since my kiddos are older it was easy enough to just dye them! :)
DeleteThese are really, really neat!!! I love the bright colors! When your kiddos play with them (after the color has set) does it leave color on their skin? I think I may need to make a few sets as gifts!! Thanks so much for the wonderful idea!
ReplyDeleteThank you, Amy!!! I love the colors too. I'm addicted to rainbows!!! Nope - not at all. Though I suspect if their hands were wet some of the color would get on them. Liquid watercolors are washable should that happen, but mostly we just are sure that their hands are dry before they play with them and it's no problem!
Deletebrilliant, I have seen your post a million times but couldn't remember your blog name when I needed it, so I just googled dye your own wooden blocks and you were my first hit. Nice one, its such a lovely post.
ReplyDeleteWahooo!!! Thank you, Google!!!! And thank you, The Monko! :)
DeleteWow, these are awesome! Can you tell me what the smallest sized block you used was?
ReplyDeleteThank you so much! They are 1 inch blocks. :) Hope that helps!
DeleteThat's really helpful, I bought 1 inch blocks and wondered if they were too small. Thanks for the tutorial, this is a fantastic project!
DeleteThey are smallish for sure - but it was what was in stock at our local craft store - so worth it for the price! Any sized block would work, but I suspect those 1 inch ones are easiest to find...
DeleteI made some of these tonight and had a little tip to share. We used the little dobber bottles from Discount School Supply and just dotted it on. No mess, no waste and I dyed 12 blocks in 12 different colors in less than 10 minutes. Probably closer to 5.
ReplyDeleteGreat tip! We don't have any of those bottles, but I bet it would be super fun to dye them that way!
DeleteGreat idea! You can dip the dried blocks in vinegar to seal the paint, it works nicely! I beeswax Polish makes the color look brighter too
ReplyDeleteGreat tips, Crystal! We'll have to give those a try next time we're dying wood (which will probably be soon because we love it so much!!!).
DeleteHi crystal, do you just dip them straight in vinegar? how long for please? I painted some peg dolls with water colour and looking for ways to seal them.
Deletethankyou.
thara
Ohhhh these are fantastic! So many wonderful ideas running through my head. I think I just found a weekend project. Thanks!
ReplyDeleteYay! Once you start you can't stop. But everything is much prettier afterwards, hahaha! :)
DeleteThese are great! Thanks for the ideas!! Love the tropical color collection!
ReplyDeleteThank you! :)
Deleteso beautiful!!! love love love
ReplyDeleteThank you so much! :)
DeleteWe did this today - it was awesome. Of course I added in a little 'lesson' about color theory and the girls made 10 more colors from mixing our watercolors. They are so pretty (made for my nephews 1st birthday) the girls don't want to give them away. Hope you are well Asia. xxx
ReplyDeleteAwesome!!! Love it!
DeleteOh - sorry - we also dunked ours in little bags - used very little watercolor and the mess was contained. #2 being a whirlwind of mess & destruction.
ReplyDeleteHahahaha
DeleteHi there Aisa,
ReplyDeleteYou're blocks look beautiful. You've inspired me no end! I'm taking a more time consuming route, having gone to the hardware store today and purchased several lengths of untreated pine in varying widths, which I'll run through the circular saw and give a quick sand back.
I managed to track down the same watercolour paints over here in Australia, that you used, and was hoping you could answer me a quick question re the colours that you have used. I'm guessing that you used all the colours in the tropical set, but have you also used colours from the other "basic" set too, and if so which colours? I'll use a homemade beeswax polish to set. Thanks heaps, Tania :-)
Oh my goodness - those will be GORGEOUS!!!! If you'd be willing to send me a photo once you're done at funathomewithkids@gmail.com, I'd love to see!!!!
DeleteFirst, I'd love to know where you found the liquid watercolors, since many of my Australian readers ask. If you're willing to share, I know they'd appreciate it!
Second, yes, I used some colors from the basic and some from the tropical. I hope that helps and I know whatever colors you use the blocks will be beautiful!
Hi again Asia,
DeleteWould be only too happy to send you through some photos once we're done - could take a few weeks though as we've got a lot on at the moment!
I'm sourcing the watercolours from this site
http://www.edex.com.au/salesperson/result/change/?p=2&q=Liquid+WaterColor&salespersonaction=page&searchHandle=QT1MaXF1aWQgV2F0ZXJDb2xvcn5CPUxpcXVpZCBXYXRlckNvbG9yfkQ9MjB_ST1QcmljZX5LPTR_TD0xfk09Mn4
I'm going to order the complete tropical set. Do you by any chance remember which colours from the classic set you also used? I intend to "top up" our tropical set with a few colours from the classic range.
Thanks again, Tania :-)
YAY! Thank you so much. Just added the link to our Liquid Watercolor info page. I am sure it will be super helpful to other Aussies!
DeleteHmmm, I think I used all of them, unfortunately (just because I had them). I'd say if you get red and green from the regular set, you'd probably have a fantastic range of colors between those and the tropical. The other colors aren't that different (like tropical orange vs. regular orange) in my opinion, to warrant the extra cost. Hope that helps and can't wait to see them whenever they're done. :)
Thanks Asia, that's what I was after. I wasn't sure if it would warrant getting the two different oranges etc.
DeleteWe use the stockmar watercolours for our wet on wet painting, but they do cost quite a bit of money, and was thrilled to learn of these other liquid watercolours from you. Busy day ahead today of sawing and sanding ;-)
Thank you for posting! I am actually going to link back to this tutorial if that is okay! I tried with acrylics prior to finding this tutotial, and they look rediculous! Thank you for sharing!
ReplyDeleteThanks for linking! And eeek, I don't think I'd have the patience with acrylics! This way is suuuuper fast and easy. :)
DeleteSo, I came across your post months ago, and added your materials to my "keep on a lookout for a good deal" list. Well, my attempt to copy you was quite exhausting and humerous so tomorrow morning I will post my experience here: http://freshlymessy.com/do-it-yourself-beautiful-grimms-wooden-rainbow-blocks-that-actually-work/ . Next time I'll just listen to you to start with :)
ReplyDeleteOh no! I hope that you eventually got them to work for you! I'm curious what went wrong since my 5 year old made most of ours quite easily (until she got bored, hah!)...
DeleteBeautiful toy DIY project. I love love love it.
ReplyDelete